
When presenting, professionals often need to condense lots of feedback or survey results into a format that allows audiences to get key points at a glance. Word clouds offer a simple, visual way to do this.
This article will guide you on what word clouds are, how to create a word cloud in PowerPoint, and answer common questions so you can use them with confidence.
- What is a Word Cloud in PowerPoint
- Benefits of Using Word Cloud in PowerPoint
- How to Create a Word Cloud in PowerPoint
- How to Make Your Word Cloud Look Better (Colors, Shapes, Fonts)
- FAQs about Creating Word Cloud in PowerPoint
- Q: Can I edit the word cloud after inserting it into PowerPoint?
- Q: What if the word cloud image exported from the word cloud generator website is too blurry?
- Q: How many words should a PowerPoint word cloud ideally contain?
- Q: Can word clouds be updated in real time?
- Q: Can I create dynamic word clouds?
What is a Word Cloud in PowerPoint
In short, a word cloud is a visual way to show text. Words appear in different sizes or colors depending on how often they appear. The more frequently a word occurs, the larger it appears.
Word clouds in PowerPoint make it easy to highlight key ideas. You can use them to:
- Show keyword patterns in articles or presentations.
- Summarize common terms from surveys or social media.
- Present team brainstorming results.
- Analyze themes in student essays or reports.
- Highlight important words in company culture or yearly summaries.
Compared to plain text, word clouds are more eye-catching and help people quickly grasp and remember the main points.
Benefits of Using Word Cloud in PowerPoint
Word clouds are practical for conveying information, they deliver maximum content with minimal text. Here are their tangible benefits in presentations:
1. Grab attention fast
Viewers can see key points in seconds. For instance, in a word cloud of 200 customer feedbacks, words like “price” or “design” stand out immediately.
2. Make info easier to remember
Visual information is more memorable than plain text. Research shows the brain processes images far faster than words.
3. Increase audience engagement
In meetings or classes, let participants add keywords live. Watching their words appear on screen keeps them interested.
4. Look professional instantly
Compared to bullet-point-filled slides, word clouds offer cleaner, more design-oriented layouts. They give a quick design boost to reports, summaries, or presentation covers.
✍ [You May Also Like]: How to Change Line Spacing in PowerPoint
How to Create a Word Cloud in PowerPoint
Now let’s dive into the detailed steps of how to make a word cloud in PowerPoint. You can try the following three methods, ranging from basic to advanced. I’ll clearly outline each step.
Method 1: Create Word Cloud using PowerPoint Add-In
If you create word clouds often, an add-in can save time. It makes word clouds right inside PowerPoint and updates them automatically.
Step 1: Open PowerPoint, click the “Home” tab, and locate the “Add-ins” option on the far right.
Step 2: In the pop-up window, search for “Pro Word Cloud” and click “Add”.
Step 3: Once installed, the add-in will appear in the right panel.
Step 4: Paste the text you want to convert into a word cloud onto your slide.
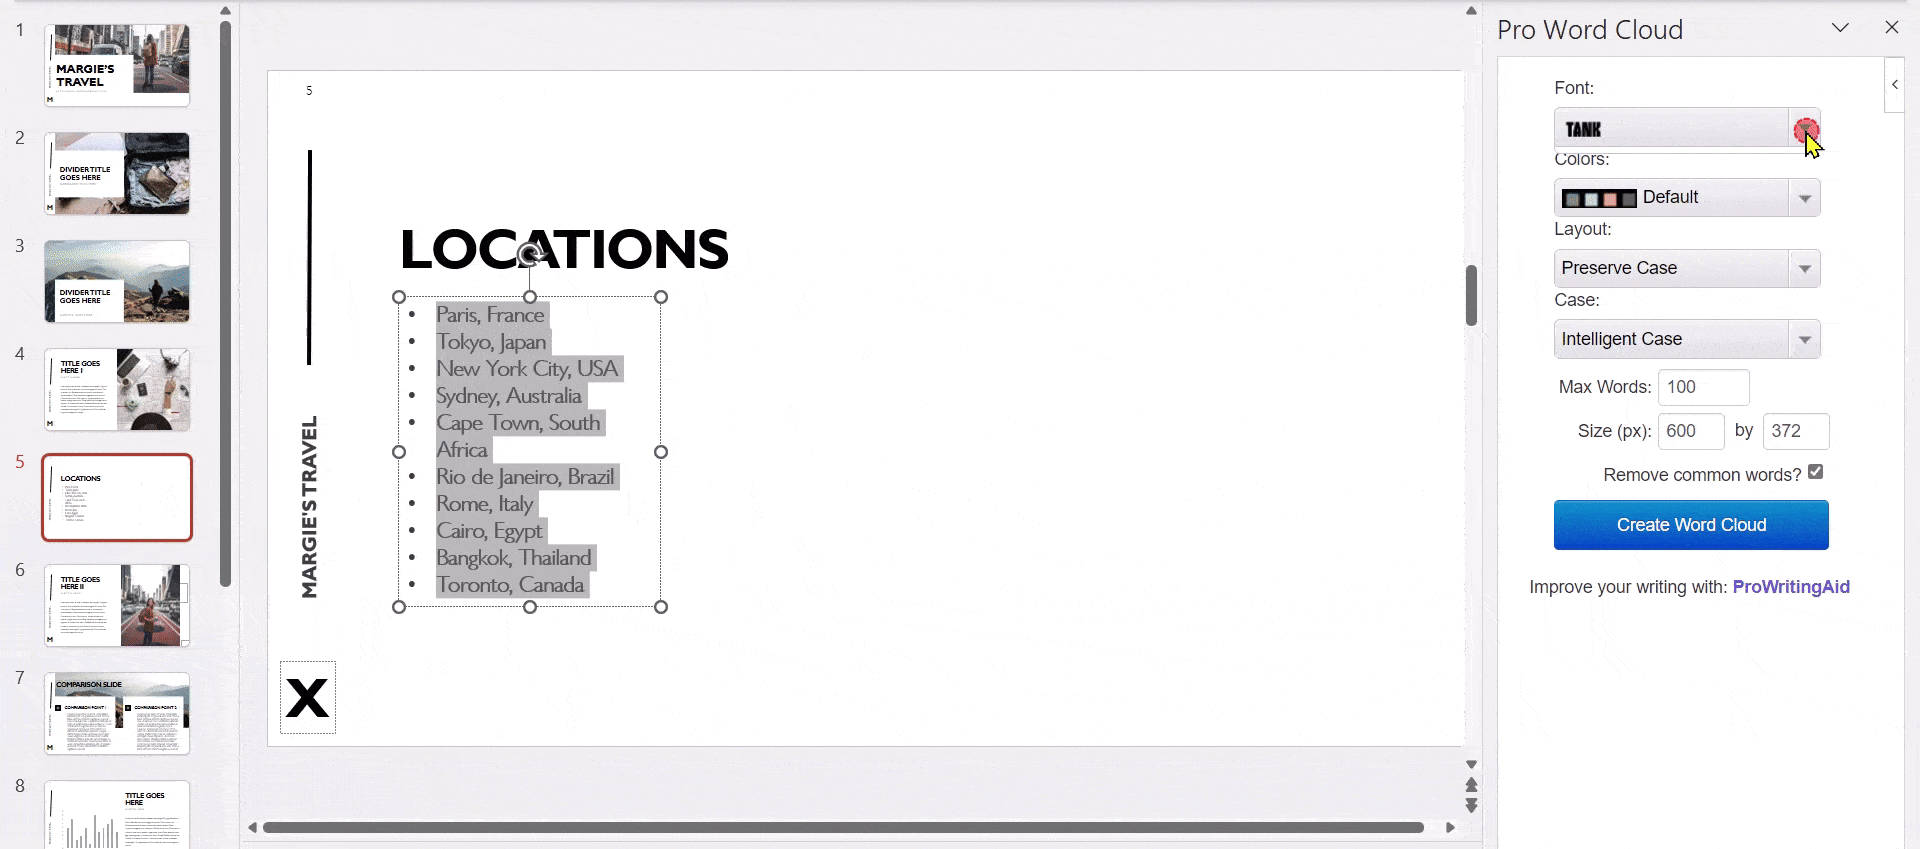
Step 5: In the add-in, customize the word cloud’s color, font, layout, shape, and other settings. Finally, click “Create Word Cloud”.
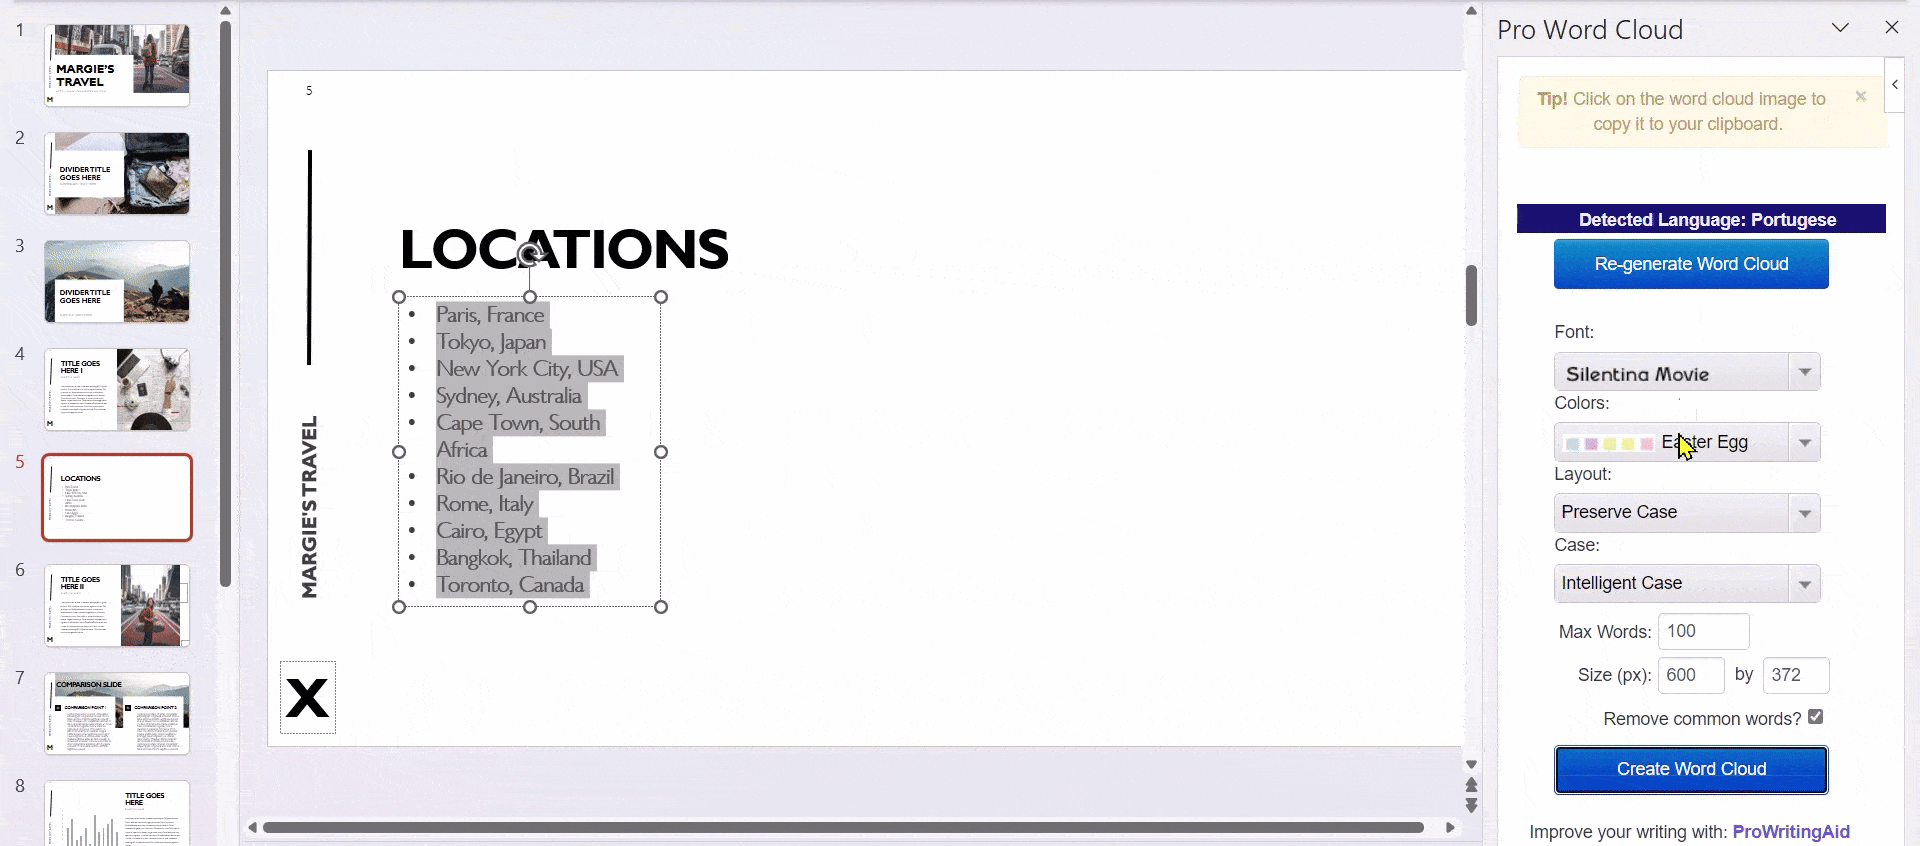
Wait a few seconds. Your word cloud will appear, and you can resize or move it to get the best look.
Is there an easier way?
If you want a professional PowerPoint without making a word cloud yourself, try WorkPPT. It quickly turns your text or documents into clean, well-designed slides. Everything—from keyword to word cloud—is automatically aligned, saving you time and effort.
Method 2: Generate Cloud of Words Manually
If you only have 10–20 keywords, you can arrange them manually in PowerPoint. It takes a bit of time, but it gives you full control.
Step 1: Open PowerPoint and create a new blank slide.
Step 2: Prepare the keywords you want to display, such as: Teamwork, Innovation, Goals, Growth…
Step 3: Click “Insert Text Box” in the top menu and type each keyword individually.
Step 4: Adjust font sizes, enlarge important words, and reduce secondary ones. For example, use 60pt for major terms and 28pt for minor ones.
Step 5: Change font styles and colors from the “Home” tab. Bold or italicize to make words stand out.
Step 6: Arrange keywords in any order. Rotate some words to mimic traditional word cloud layouts.
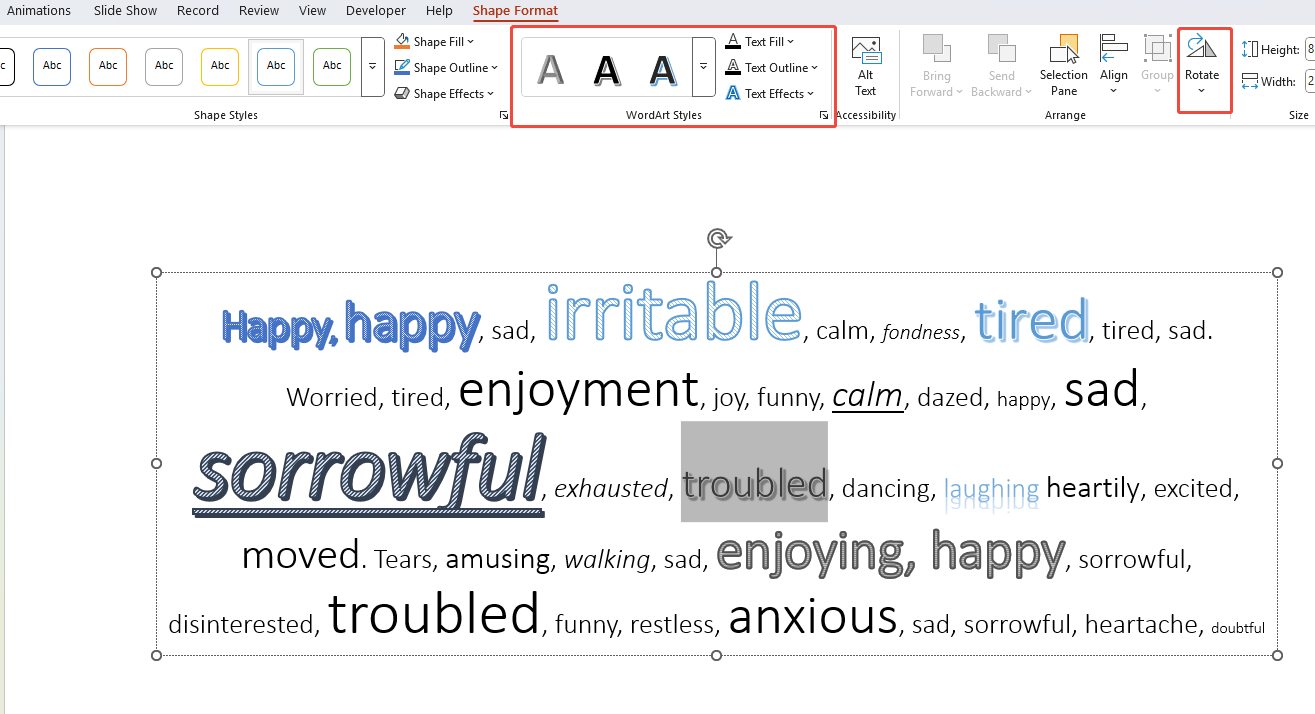
Step 7: Use “Shape Format” to apply shadow, glow, or reflection effects to keywords, ensuring clear visual hierarchy in the word cloud.
And that’s it! You can even use the word cloud as a title slide background with a semi-transparent effect for a more polished look.
Method 3: Make Word Cloud with Online Generator
If you want to save time, you can also use websites to automatically generate PowerPoint word clouds. Typically, you can get a nice-looking word cloud in just a few seconds. Here are some popular options:
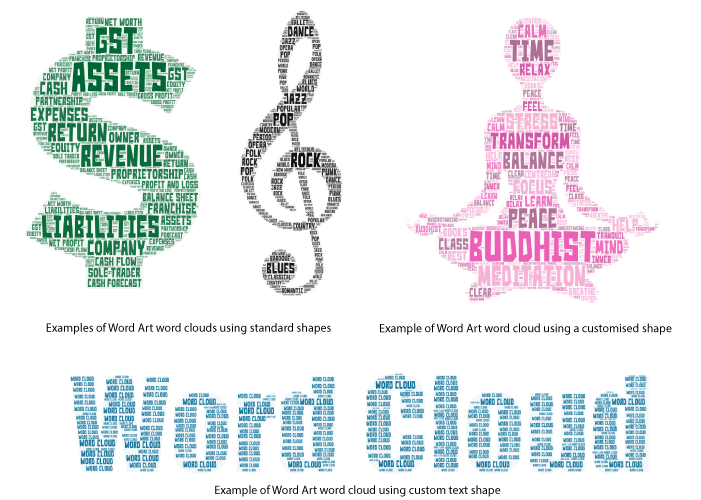
- WordArt.com: Most popular, with customizable shapes.
- WordClouds.com: Simple and easy to use, supports multiple languages.
- TagCrowd.com: Clean, efficient, and shows word frequency.
Step 1: Open the website (using WordClouds.com as an example).
Step 2: Click “File” to upload a text document, or click “Words” to paste all keywords.
Step 3: Click “Apply” to generate the word cloud. You’ll get a preliminary shape.
Step 4: Adjust the word cloud style by clicking “Shapes”, “Fonts”, “Warp”, “Theme”, “Direction”, etc.
Step 5: Download the image and insert it into your PowerPoint.
Done! In under 5 minutes, you can make a professional word cloud. Want a transparent background? Select “Transparent background” during export.
How to Make Your Word Cloud Look Better (Colors, Shapes, Fonts)
The secret to a clean, appealing word cloud is simple: color, font, and shape.
1. Keep the color simple:
- Use only 2–3 primary colors to avoid excessive complexity.
- If your PPT uses a blue theme, stick to the same color family (dark blue + light blue + white).
- For added depth, try using gradients to highlight core keywords.
2. Pick readable fonts:
- For English, use Montserrat or Roboto.
- Avoid fancy fonts that are hard to read.
3. Match shapes to your theme:
- Expressing “creativity”? Use lightbulb shapes.
- Highlighting “team spirit”? Opt for human figures or circles.
- Designing a cover? Try shaping the cloud like your logo for impact.
4. Use subtle animation:
- A gentle fade-in makes it feel lively.
- Skip spinning or bouncing—too distracting.

Work Smarter with WorkPPT AI Presentation Maker
Instantly generate ready-to-edit PowerPoint slides, no need to adjust line spacing manually.
FAQs about Creating Word Cloud in PowerPoint
Q: Can I edit the word cloud after inserting it into PowerPoint?
A: If it’s in image format, you can only resize or crop it. To modify the text content, you need to regenerate the word cloud.
Q: What if the word cloud image exported from the word cloud generator website is too blurry?
A: Select High Resolution or SVG format when exporting, then insert it into PowerPoint. Do not use screenshots!
Q: How many words should a PowerPoint word cloud ideally contain?
A: Keep it between 20–100 words for best results. Too many words will appear cluttered and difficult to read.
Q: Can word clouds be updated in real time?
A: If using a PowerPoint add-in like Pro Word Cloud, regeneration is supported. Online tools generally require manual refreshing.
Q: Can I create dynamic word clouds?
A: PowerPoint doesn’t support true dynamic word clouds, but you can simulate dynamic effects with simple animations like fade-in or zoom.
💬 Conclusion:
Creating a word cloud in PowerPoint is an easy way to make your slides stand out. You can make it by hand, use an online tool, or add an add-in. Next time, try adding one, it’s simple, informative, and adds a little “wow” to your slides.