author image

Google Slides is an essential tool for creating engaging presentations, but sometimes, you may want to ensure that specific elements (like images or objects) stay in place as you work. Whether you are collaborating with others or simply need to avoid accidental changes, locking elements in Google Slides is a valuable feature.

In this article, we’ll guide you through how to lock an image, slide, or objects in Google Slides and explore how to group items for more streamlined editing.

Locking images in Google Slides can prevent them from being accidentally moved or resized. While Google Slides doesn’t provide a direct “lock” feature for images, there are workarounds to achieve this effect.

  • Use the “Format Options” Menu:
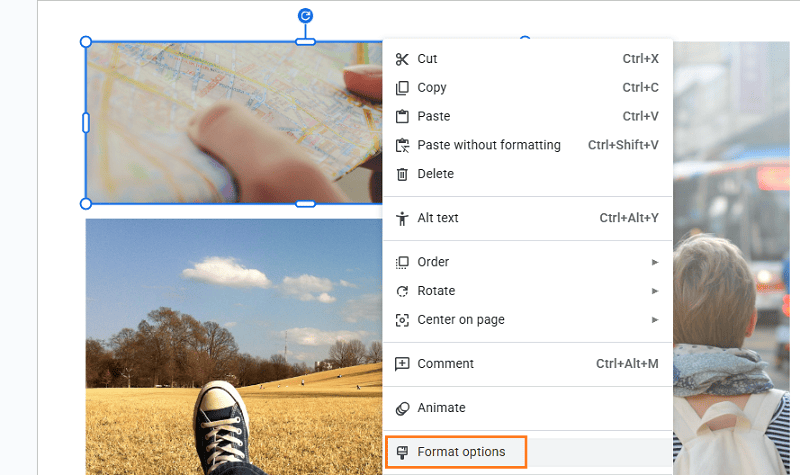
      • Select the image you want to lock.
      • Right-click and choose Format options.

    image format options

      • Under Position, check the boxes that allow you to “Lock aspect ratio” and set a fixed position on the slide.

    change image position

This doesn’t technically lock the image, but it does restrict how much you can alter its size and position.

  • Group the Image with a Shape (Best Workaround):
      • Draw a shape (like a rectangle) over the image.
      • Select both the image and the shape by holding down Shift and clicking on each element.
      • Right-click and choose Group. This groups both items together and limits the image’s movements, simulating a “locked” effect.

    lock group in google slides

workppt banner

Want to Save Time in Slide Creation?

With WorkPPT AI, you can create slides with ready-made transitions, motion effects, and perfect formatting — no manual adjustments needed.

How to Lock a Slide in Google Slides

If you’re concerned about locking a slide in Google Slides, you’ll need to take a different approach, as Google Slides doesn’t offer a direct lock feature for entire slides. However, here are a few methods to achieve something similar:

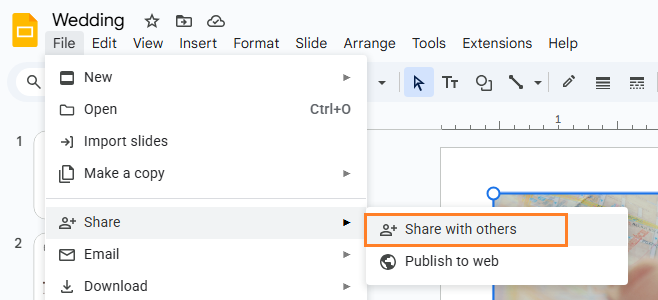
  • Disable Editing for Others (View-Only Access):
      • Go to FileShare.
      • Choose the people you want to share the slide with and set their permissions to Viewer instead of Editor.

    lock share settings

    • This will prevent others from making any changes to the slide content.
  • Use Master Slides:
      • By placing background elements (like logos or images) in the Master Slide, you can ensure that they appear on every slide without being accidentally moved.
      • To access the Master Slide, go to SlideEdit master.

    Learn detailed guide to edit master slide >>

How to Lock Objects in Google Slides

Locking objects (text boxes, shapes, images, etc.) in Google Slides is a useful technique when you want to maintain consistency in your presentation design. While there isn’t an official “lock” feature, you can use several methods to achieve similar results:

  • Group Objects:
    • Select the objects you want to lock by clicking on them while holding down Shift.
    • Right-click and select Group. This will combine the objects into one unit, preventing accidental movement or resizing.
  • Position and Layer Objects:
    • Once objects are grouped, you can set specific positions by right-clicking and choosing Align or Distribute.
    • This helps you arrange your objects more precisely, reducing the chances of errors during editing.

Why You Need to Lock Image and Object in Slides?

Locking images and objects in Google Slides is essential for maintaining the integrity and design of your presentations. Here are a few reasons why:

  • 1. Prevent Accidental Edits: Locking elements ensures that they can’t be accidentally moved, resized, or deleted, saving you from unwanted changes.
  • 2. Maintain Consistency: It helps maintain the position and size of images or objects across multiple slides, keeping your design uniform.
  • 3. Control Collaboration: When working in teams, locking objects prevents others from modifying key elements, ensuring your vision stays intact.
  • 4. Improved Productivity: By locking critical elements, you can focus on content creation without worrying about layout errors or disruptions.
  • 5. Better Layout Integrity: Grouping and locking objects help keep complex layouts intact, ensuring elements stay aligned and well-organized.
  • 6. Enhanced Professionalism: A polished, stable design looks more professional, particularly when you need to deliver a presentation without technical distractions.

FAQs: Locking Images and Objects in Google Slides

Can I lock text boxes in Google Slides?

Similar to images, text boxes can be grouped with other elements to prevent editing. However, there is no specific “lock” feature for text boxes in Google Slides.

How do I lock a background image in Google Slides?

Use the Master Slide to add a background image that will stay fixed across all slides. This prevents accidental deletion or changes to the background.

Why is it important to lock images and objects in Google Slides?

Locking images and objects ensures your presentation layout remains consistent, prevents accidental edits, and improves collaboration by maintaining design integrity.

Can you lock shapes and lines in Google Slides?

Yes, you can group shapes and lines with other objects to prevent them from being moved or resized accidentally during editing.

💬 Conclusion:

Locking images, slides, and objects in Google Slides isn’t as straightforward as some other platforms, but with the right strategies and workarounds, you can maintain the integrity of your presentation design. These techniques will help ensure your content stays in place and your collaborators can’t make unintended changes.

If you don’t want to waste time on making slide manually, try WorkPPT AI Presentation Maker to enjoy text/file to slides in 1-click.