Google Slides animations make your presentation come alive — turning plain slides into something fun, dynamic, and easy to follow. Text, charts, and pictures all allow adding animations in Google Slides. In this guide, you will learn what is Google Slides animations and how to make it on PC and phone.
- About Google Slides Animation
- How to Make Animation to Google Slides (Step-by-Step)
- How to Animated Bullet Lists in Google Slides - ”By Paragraph” Trick
- How to Add Animation in Google slides on Phone/iPad
- Cool Google Slides Animation Ideas
- Do’s and Don’ts of Animating in Google Slides
- FAQs Related to Google Slides Animations
- Q1: How do I Animate multiple objects in Google Slides?
- Q2: How do I animate the bullets so that they appear one at a time?
- Q3: How to make Animations happen at the same time?
- Q4: Can I make Google Slides animations automatic?
- Q5: How to add moving pictures on google slides
- Q6: How to animate text on Google Slides?
- Q7: How many object animations can I add in Google Slides?
- Q8: How to remove animation in Google Slides?
About Google Slides Animation
What is an Animation in Google Slides
Google Slides animations are motion effects applied to text, images, and shapes to make presentations more engaging.
Animations can draw attention, explain processes, or guide the audience’s focus as you present.
Common animation types include:
- Fade in / Appear – Smoothly reveal elements.
- Fly in / Zoom in – Add motion for emphasis.
- Spin / Bounce – Fun or energetic visual styles.
Animations can be customized to start on click, after previous, or with previous for perfect timing.
Difference Between Transition and Animation in Google Slides
Google Slides effects involve slide transitions and object animations. Many users confuse transitions with animations — here’s a quick breakdown:
| Features | Animation | Transition |
| Applies to | Text, images, shapes,charts | Whole slides |
| Purpose | Emphasize or reveal content | Control flow between slides |
| Customizable | Trigger, order, speed | Duration only |
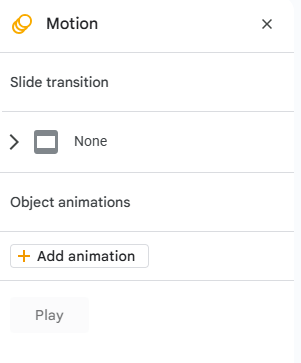
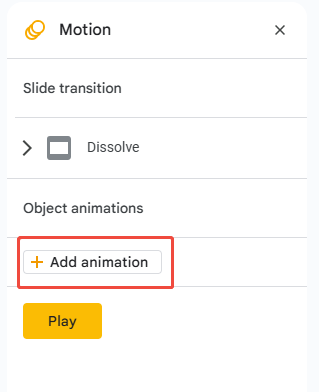
Both settings live in Google Slides Motion panel:
1. Slide Transition: Controls the animation that occurs when you move from one slide to the next.
2. Object Animations: Controls the animation of specific elements within the currently selected slide.

How to Make Animation to Google Slides (Step-by-Step)
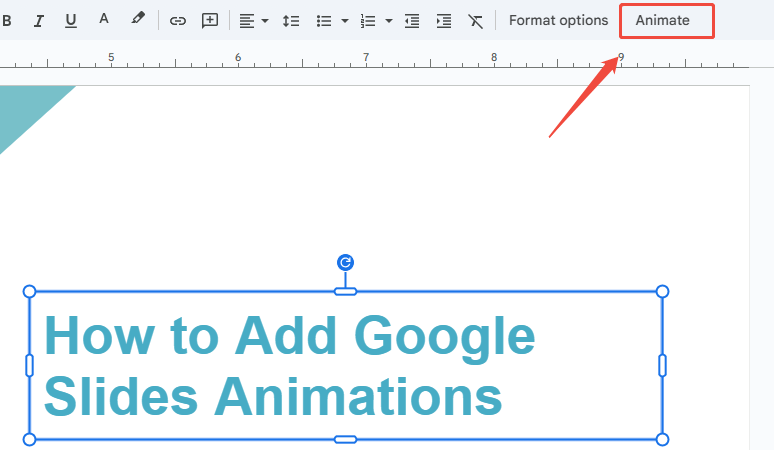
How to make objects move in Google Slides? Follow these steps:
1. Click directly on the text box, shape, or image you want to animate. Then access to the Motion panel.

2. In Motion Panel, click “+ Add animation.” A default “Appear” effect will appear.

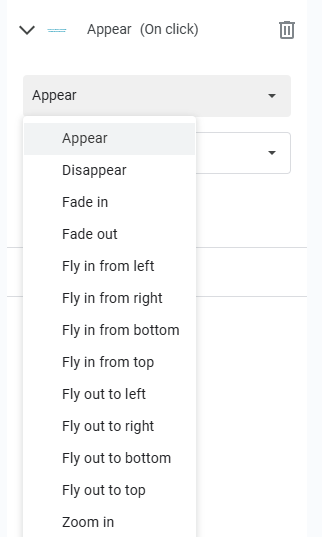
3. Click the dropdown menu to select the type of animation. Popular animations in Google Slides include:
- Appear / Fade In: Subtle and professional.
- Fly in from [Direction]: Ideal for introducing new elements onto the screen.
- Zoom In / Zoom Out: Good for emphasizing charts or photos.

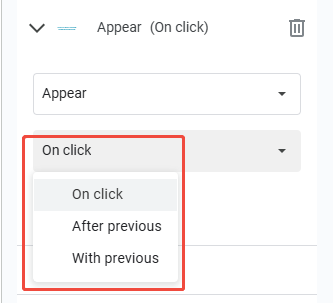
4. This is the most crucial setting for controlling your presentation flow. Choose one of the following:
- On Click (Recommended): The animation starts when you click your mouse or press the spacebar. This gives you complete control over your pace.
- After Previous: The animation begins immediately after the object before it in the animation list finishes.
- With Previous: The animation starts simultaneously with the object before it.

5. Click “Play” to preview the effect in presentation mode

Want to Add Animations Instantly?
With WorkPPT AI, you can create slides with ready-made transitions, motion effects, and perfect formatting — no manual adjustments needed.
How to Animated Bullet Lists in Google Slides - ”By Paragraph” Trick
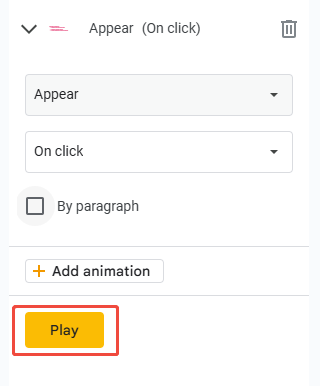
When animating text boxes or bullet lists, enable “By paragraph” to reveal each line one by one. How to enable:
1. In the Motion Panel, select your text box.
2. Check the box “By paragraph” under animation options.

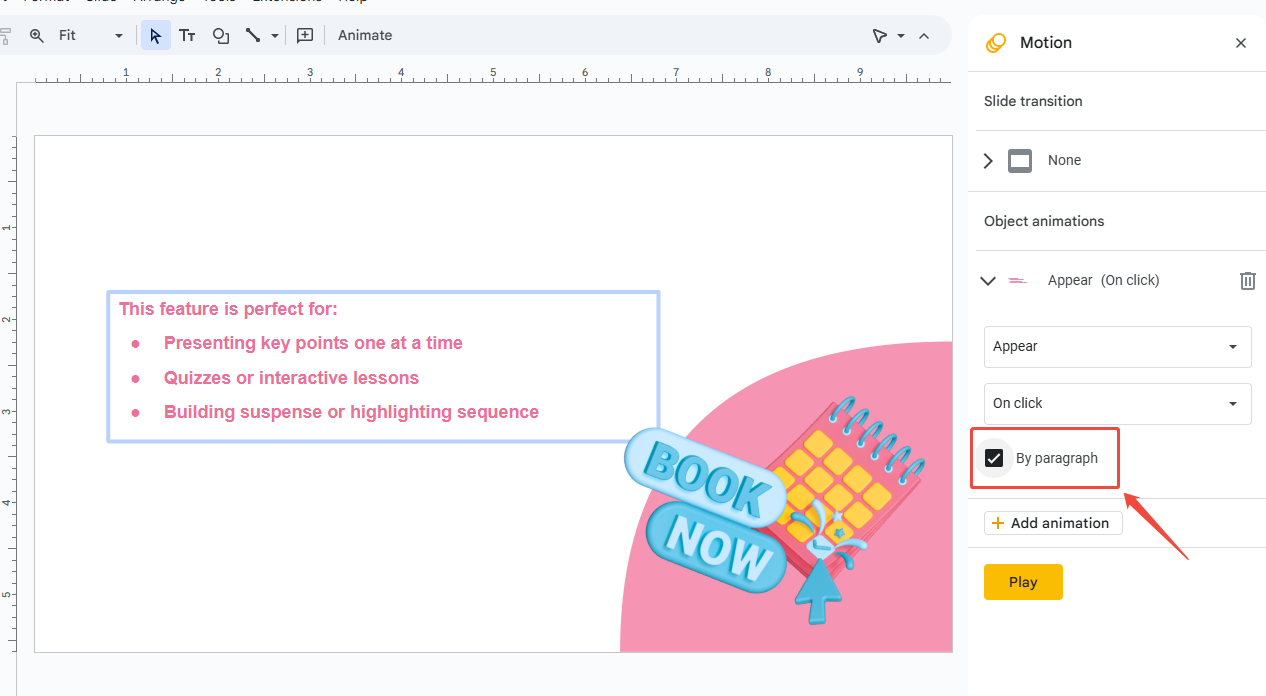
This feature is perfect for:
- Presenting key points one at a time.
- Quizzes or interactive lessons.
- Building suspense or highlighting sequence.
✍ [You May Also Like]: How to Create Google Slides: Build a Perfect Deck from Scratch
How to Add Animation in Google slides on Phone/iPad
Actually, the Google Slides App does not support adding or editing animations directly on an iPad or phone. The mobile app only allows you to play presentations that already have animations.
However, there is a workaround: you can use the desktop version of Google Slides in your device’s web browser(Safari/Google Chrome). Here are the steps:
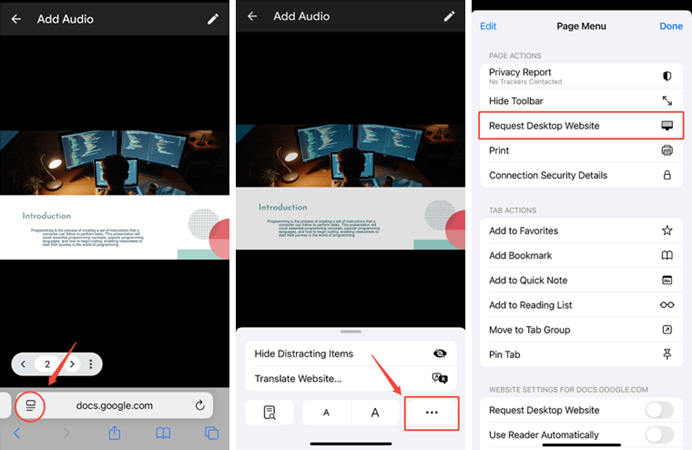
1. Open Your Browser: Launch Chrome, Safari, or another web browser on your iPad or phone. Here I open Safari.
2. Go to Google Slides: Navigate to Google Slides and choose one presentation you want to edit.
3. Request Desktop Site:
Click on the icon on the left side, then click the three-dot menu (⋮) at the bottom right. You will find “Request Desktop Website”.

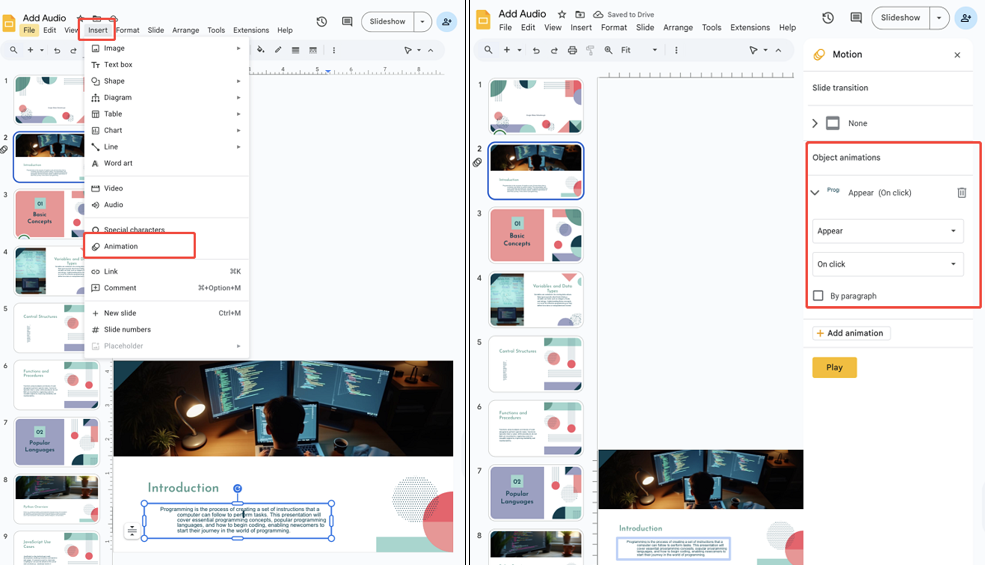
4. Select an Object: Tap on the text box, image, or shape you want to animate.
5. Add Animation:
Go to the menu bar and tap Insert > Animation. A “Motion” panel will appear on the right side. Choose your desired effect (e.g., “Fade in,” “Fly in from left”) in Objection animations.

You can also play the animation on mobile phone as on the computer.
Cool Google Slides Animation Ideas
Want to make your slides stand out? Here are some cool animation ideas about how to use animations in Google Slides:
Text Emphasis Animation
Use a “Fade Out” on the old text, and a “Fade In” on the new, bolded text, using the After previous trigger.
Chart Motion Animation
Use “Zoom In” or “Fly In” on individual bars or segments of a chart (grouped shapes).
Image Reveal Animation
Cover a final image with a white shape. Animate the white shape to “Fly Out” (leaving the image behind).
Sequential Storytelling
Animate an icon/shape to “Fly In” from the left, then use “Fade Out” to remove it. On the next click, make a different icon “Fly In” from the left.
✍ [You May Also Like]: Storytelling in Presentations: How to Cativate Your Audience
Layered Transitions
Use the “Dissolve” Slide Transition combined with an object’s slow “Fade In” animation on the new slide.
Do’s and Don’ts of Animating in Google Slides
| Do’s | Don’ts |
| Keep timing short (under 1s) | Avoid long, slow animations |
| Use consistent styles across slides | Don’t mix too many effects |
| Preview before presenting | Don’t overload every slide |
| Use motion to emphasize key info | Avoid distracting spin/bounce effects |
FAQs Related to Google Slides Animations
Q1: How do I Animate multiple objects in Google Slides?
A: To animate multiple objects, hold Shift and click each element you want to include (such as text boxes, images, or shapes). Then go to Insert → Animation or open the Motion panel. Choose an animation effect, and all selected objects will share the same motion settings.
Q2: How do I animate the bullets so that they appear one at a time?
A: Select the text box with bullet points, open the Motion panel, and choose your animation (like “Appear” or “Fade in”). Then check the “By paragraph” option.
Q3: How to make Animations happen at the same time?
A: To make two or more animations start simultaneously, you must use the “With previous” trigger.
- Animate the first object and set its trigger to “On click” or “After previous” (this is the anchor).
- Animate the second object. In the Motion Panel, change its trigger to “With previous.”
The second object will now start moving at the exact moment the first object starts, creating a synchronized effect.
Q4: Can I make Google Slides animations automatic?
A: Yes.In the Motion Panel, Change the trigger dropdown menu from “On click” to “After previous.” This forces the object to start moving automatically as soon as the animation listed before it finishes.
Q5: How to add moving pictures on google slides
A:Adding animations to make pictures move:
1. Open your Google Slides presentation and select the slide.
2. Insert a picture by clicking Insert → Image.
3. Click the picture, then choose Insert → Animation (or right-click and select Animate).
4. In the Motion panel, click Add animation.
5. Choose an animation type (such as Fade in or Fly in), set the trigger and speed.
6. Click Play to preview the movement.
Q6: How to animate text on Google Slides?
A:Here are the steps:
1. Open your Google Slides presentation and select the slide.
2. Click the text box you want to animate.
3. Go to Insert → Animation (or right-click and select Animate).
4. In the Motion panel, click Add animation.
5. Choose an animation effect, then set when it starts and how fast it moves.
6. Click Play to preview the text animation.
Q7: How many object animations can I add in Google Slides?
A: There’s no fixed limit. Each object can have multiple animations, and a slide can have many animated objects. However, too many animations may slow down performance. Grouping objects can help manage them efficiently.
Q8: How to remove animation in Google Slides?
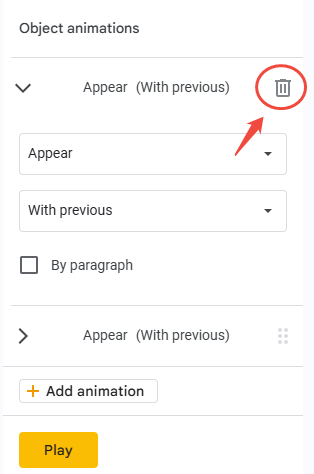
A: Select the object you want to remove the animations, and then access to the motion panel. There is list all animations applied to that object. Click the trash can icon next to the effect you want to delete.

💬 Conclusion:
Animations in Google Slides help you tell stories more effectively — from subtle text fades to dynamic chart reveals. By understanding the Motion Panel, mastering the By Paragraph trick, and experimenting with creative animation ideas, you can make any presentation come alive.
And if you’d rather skip the manual setup, let AI do it for you. With WorkPPT AI Presentation Maker, you can generate fully animated, professional presentations in just a few clicks — no design experience required.

