author image

Presentations are everywhere in work and study. Google Slides is a popular tool for creating them, and you’ve probably heard of it. But do you really know how to make Google Slides from scratch?

This guide will take you through everything you need to know. From choosing templates, formatting text, designing images and charts, to adding animations and audio, and finally exporting your slides. We’ll show you step by step how to create a Google Slides that looks great and makes sense.

Google Slides is an online presentation tool from Google, similar to Microsoft PowerPoint, but focused more on collaboration and real-time editing. It runs entirely in your browser, so there’s no software to install. You just need a Google account and an internet connection to create your slides.

Compared to traditional presentation tools, Google Slides offers clear advantages:

  • Real-time collaboration: Multiple people can work on the same presentation at the same time.
  • Auto-save: Every change is saved to the cloud automatically, so you never have to worry about losing your work.
  • Version history: You can check past versions and see who made which changes.

Because of this, Google Slides is perfect for modern workplaces and remote collaboration.

How to Prepare for a Perfect Google Slides Presentation

Before you start creating, plan ahead. It makes your presentation more organized and easier on the eyes.

1. Define Your Goals and Audience

  • Clarify your goal: Are you informing, persuading, teaching, or motivating your audience?
  • Know your audience: Are they experts, partners, or clients? Different audiences need different tones and visuals.
  • Consider time and setting: How long is the presentation? Will it be in a large conference room, online, or a small classroom? What equipment is available?

2. Collect Materials and Outline Your Content

  • Research materials: Gather data, images, and stories, such as industry reports, company statistics, and user cases.
  • Organize your sources: Make sure every source is clear and reliable.
  • Create an outline and flow: Follow a three-part structure: opening to introduce the topic, main section to present and solve problems, and closing to summarize and call to action.

3. Prepare Visual Assets

  • Decide which information works best as charts or images instead of just text.
  • Keep your visuals consistent in style and size to make your slides look clean and uniform.

4. Structure and Timing of Your Presentation

  • Add a table of contents to give your audience an idea of what’s coming.
  • Keep each slide to about a minute of speaking, so your presentation flows smoothly.

Once you’ve done these preparations, you’re ready to start designing and creating your Google Slides.

Turn Topic to Slides in 1-click

If you need professional, custom-branded slides instantly, consider using WorkPPT, turning hours of design work into minutes.

Step 1: Pick a Template That Fits Your Theme

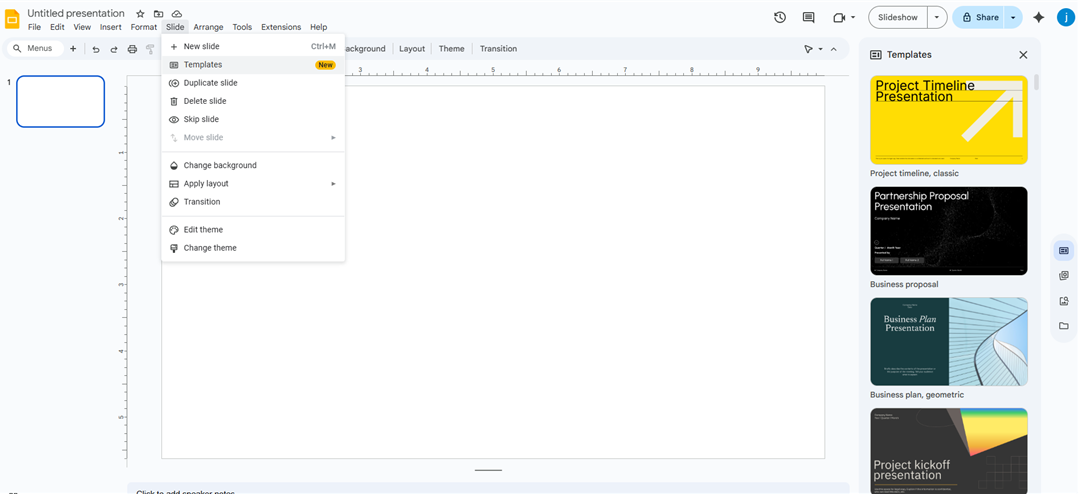
The template sets the first impression of your Google Slides and also affects its overall structure and visual style.

In Google Slides, go to “Slide > Templates” to browse the built-in library or download third-party templates.

choose google slides template

  • When picking a template, make sure it matches your theme: the fonts are easy to read, the slide size is perfect, and the layout is clear.
  • A good rule is to use three colors: a primary color, a secondary color, and an accent color. Avoid using too many bright, saturated colors.

Once you’ve chosen the right template, you can start planning your content.

Step 2: Craft Clear and Engaging Text

Now it’s time to fill in the most important part — your text. The words on your slides are the heart of your presentation. They decide whether your audience can understand your message clearly and completely.

🔤 Fonts, Styles, and Text Length

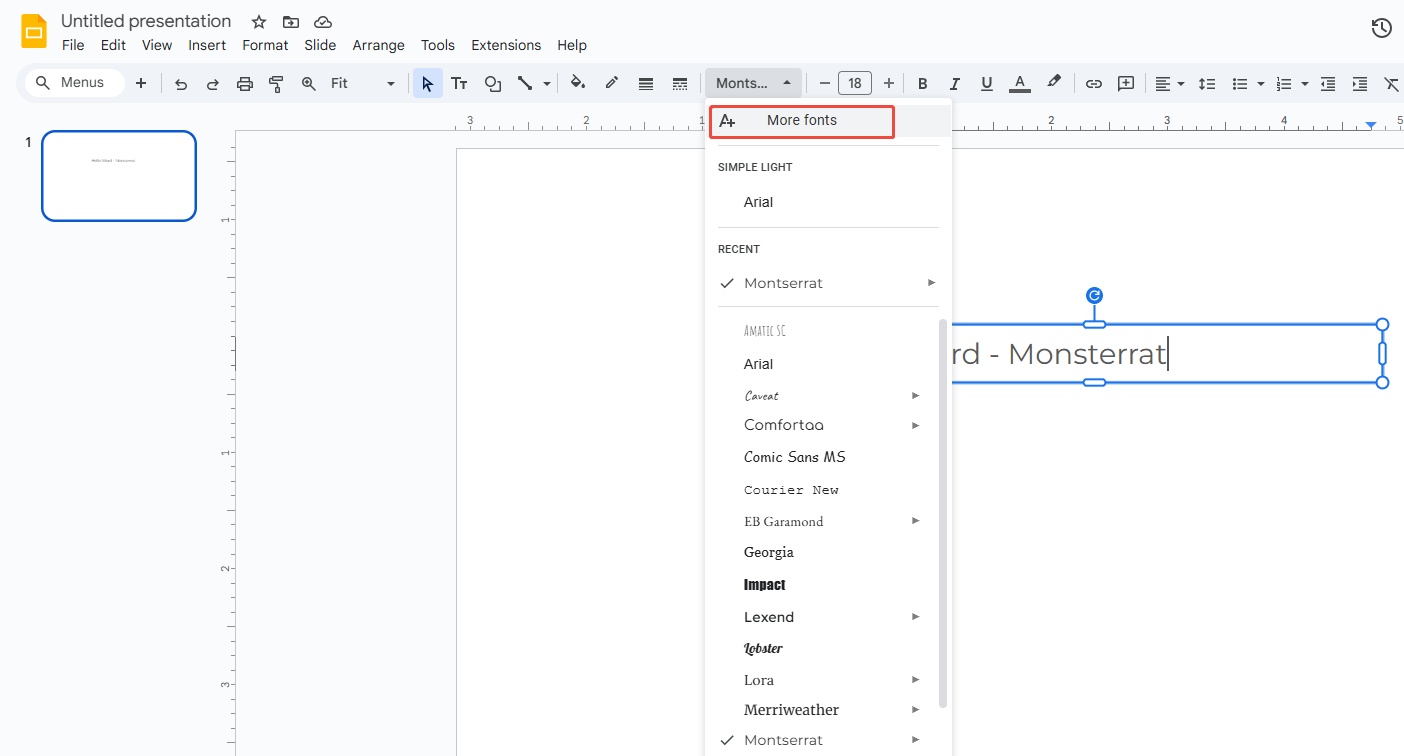
Google Slides supports the most common fonts like Arial, Open Sans, and Roboto. If you want more options, click “More Fonts” in the top menu to search and add additional fonts.

add and choose fonts in google slides

Recommended combinations:

  • Title fonts: Roboto Slab or Montserrat (modern and professional)
  • Body fonts: Open Sans or Noto Sans SC (clean and easy to read)
  • Font size: Titles 36–44pt; Body text 20–28pt

Keep your font style consistent throughout your presentation. Avoid using more than two or three fonts on one slide — too many styles can distract your audience.

📄 Line Spacing and Formatting for Better Readability

Try to keep each slide under 40 words and each line within 6 words. Before finalizing, double-check the word count in Google Slides. If there’s too much text, move some of it to the speaker notes.

Use bold text or color to highlight key points. If you have a lot of information, use bullet points to make it easier to read.

  • Proper line spacing makes a big difference in readability. Set hanging indent and keep paragraph spacing consistent.
  • Use left alignment for better readability, and center alignment for titles or important statements.
💡 Time saver: You can use WorkPPT AI slides generator to automatically match colors and layouts, saving you time on manual adjustments.

Step 3: Add Images and Charts

Beautiful Google Slides often follow the rule: less text, more visuals. So next, let’s add images and charts to make your information easier to understand.

🖼️ Insert and Enhance Visuals for a Polished Look

insert images in google slides

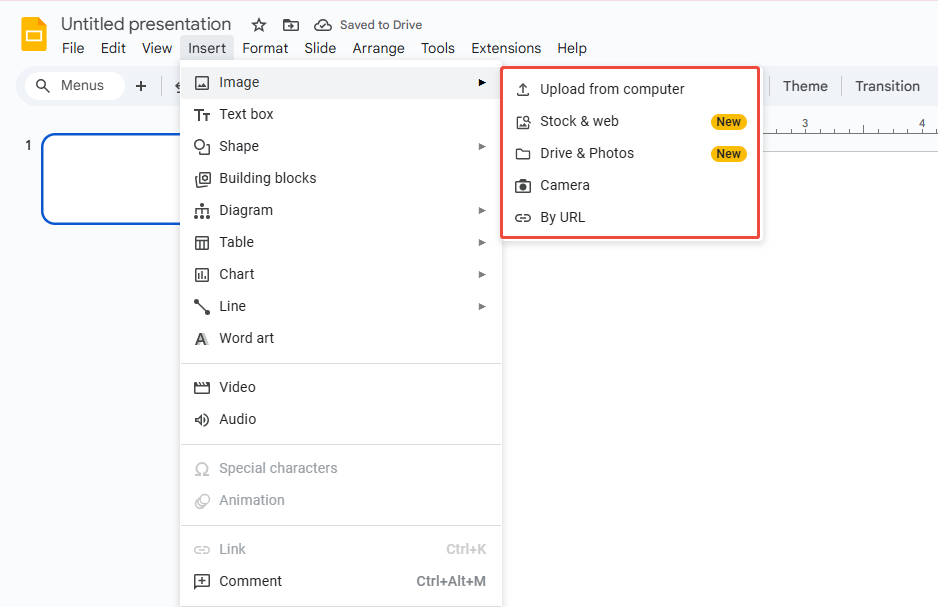
You can add images in a few ways:

  • “Insert > Image > Upload from computer”
  • “Insert > Image > Stock & web”
  • “Insert > Image > Drive 7 Photos”

Use “Format options” to adjust brightness, shapes, and transparency of images. Keep all images the same size and spacing for a clean, balanced look. Add subtle shadows or rounded corners to give your slides more depth and style.

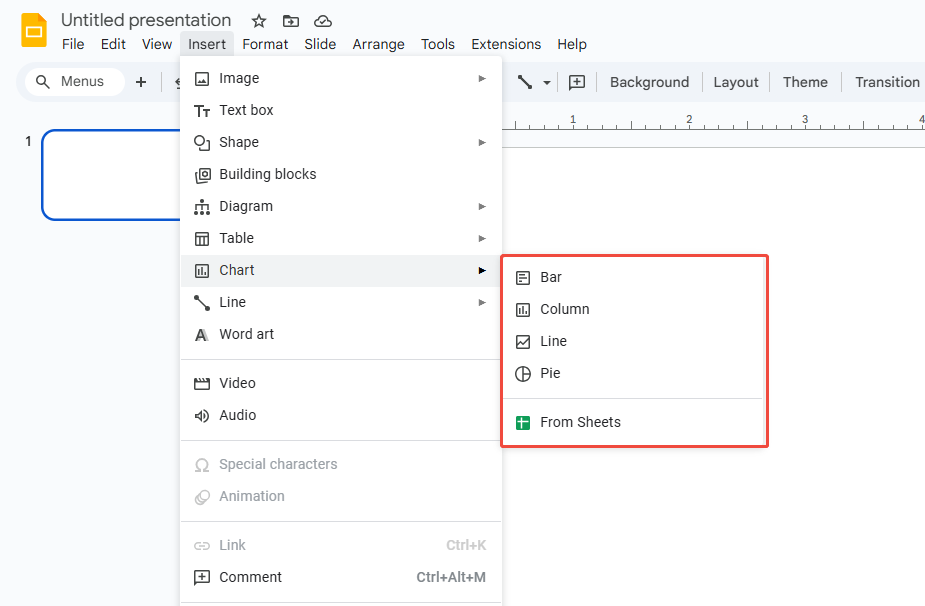
📈 Use Charts to Present Data Effectively

When you need to show data, trends, or comparisons, charts and diagrams in Google Slides work much better than plain text.

Go to “Insert > Chart”, then choose a chart type, or link directly to Google Sheets. Once you update your data in Sheets, your chart in Slides will automatically refresh. This is perfect for project reports or quarterly summaries.

insert chart on google slides

Make sure all visuals, like pictures, pie charts, or Venn diagrams, use consistent colors and match your slide theme. Avoid mixing random styles, as that can make your presentation look messy.

workppt banner

Design Smarter with WorkPPT AI

Tired of spending hours designing your Google Slides? Try WorkPPT for free today and transform plain slides into eye-catching presentations!

Step 4: Add Animations & Audio

Using animations and inserting audio the right way can turn your slides from static and dull into a dynamic, engaging story. While Google Slides doesn’t offer as many advanced animation options as PowerPoint, it’s still powerful enough for most business and educational needs.

▶️ Use Animations to Improve Visual Flow

Click the image or text you want to animate, then go to “Insert > Animation”.

insert animation on google slides

Common animation types include:

  • Fade in/Fly in: great for smooth title or paragraph transitions.
  • On click: perfect for revealing key points one by one.
  • Rotate/Zoom: ideal for highlighting images or icons.

Keep animations minimal — around 1–3 per slide — to avoid overwhelming your audience.

📣 Embed Audio for a More Engaging Presentation

You can add audio by going to “Insert > Audio” and uploading an MP3 or WAV file. Or, if you want to use a video in Google Slides, just click “Insert > Video”.

insert video and audio on google slides

For audio, you can choose how it plays:

  • Automatically: great for background music or narration.
  • On click: works well for teaching clips or timed with animations.

Make sure to keep the media length and volume under control so it doesn’t distract from your presentation.

Step 5: Final Review and Polish Before Presenting

Don’t rush to export your slides once you’re done. The final polishing stage is just as important. Even if your content is great, small issues like inconsistent fonts, spacing, or awkward animation timing can easily distract your audience.

  • Check accuracy: Make sure all data, spelling, and units are correct.
  • Keep visuals consistent: Use the same fonts, shape colors, and spacing throughout.
  • Maintain image quality: Avoid stretched or blurry pictures.
  • Smooth animations: Transitions should feel natural, not distracting.
  • Ensure logical flow: Each section should connect naturally with a clear beginning, middle, and end.

Finally, use alignment and distribution tools to fine-tune positioning, and preview your slides in presentation mode to see the final effect.

Step 6: Extra Settings for a Smooth Delivery

You can also make some advanced settings to make your Google Slides look good and smoother.

If you have backup content or slides meant only for internal reference, which shouldn’t appear during the presentation, right-click the slide thumbnail and hide the slide. And you can also print your notes in the Speaker Notes. This is perfect for long presentations or when you need a script to follow.

If you want your slides to play on loop automatically without touching anything, go to “File > Publish to the web > Auto-advance slides”, and choose the interval—like every 8 seconds per slide—to set it up.

Final Step: Export or Share Your Presentation

Once you’ve finished designing all your slides, the last step is to share or export your work. Google Slides gives you several ways to do this, depending on your needs.

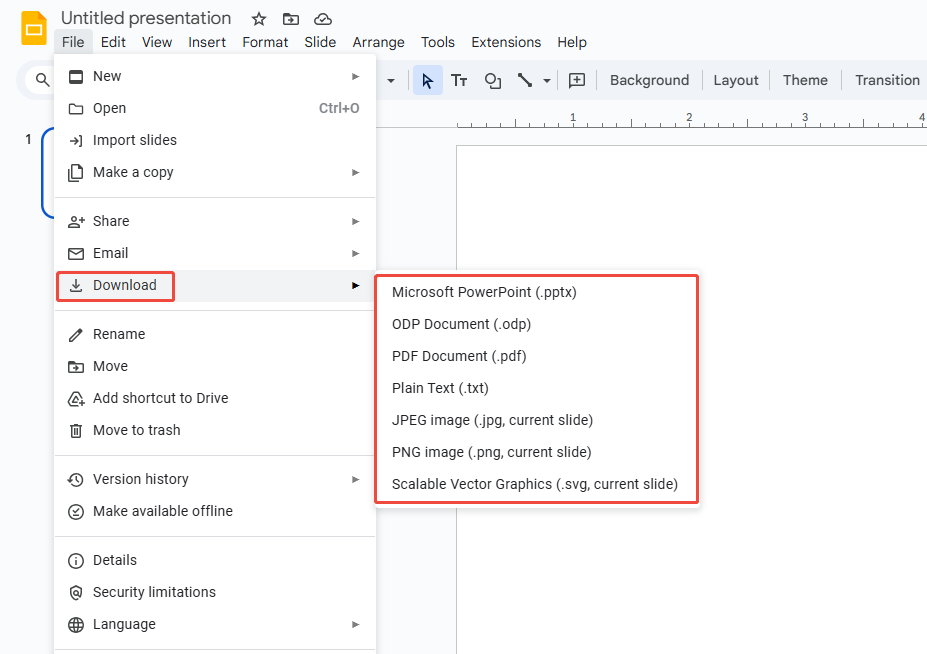
If you want to save a file, go to “File > Download” and choose from .PPTX, .PDF, or .JPEG. Before exporting, make sure to check your margins and resolution.

download the google slides

To embed or publish your slides online, click “File > Publish to web” to get an iframe code or a public link. This works well for websites, blogs, or internal portals.

publish the gogle slides to web

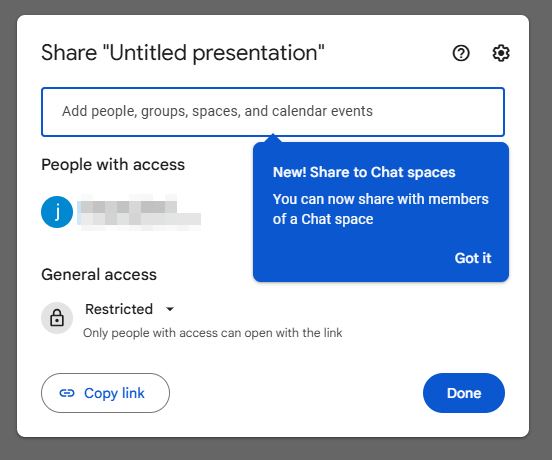
When sharing a link, you can lock your file and control permissions, such as who can view it and whether downloading is allowed.

set the limitation of the google slides

Experience WorkPPT - Complete All These Steps in One Click

Creating a traditional presentation usually means picking a template, adjusting fonts, designing icons, setting up animations, and more. But with WorkPPT AI Slides Maker, you can do all of this in just one minute.

ai to make powerpoint presentation

Why professional designers choose WorkPPT:

  • 📄Instantly extract content and topics from your documents to build complete slides.
  • 🧠Access over 5,000 professional Google Slides templates.
  • 📊Pre-set fonts, color schemes, and chart styles ready to use.
  • ⚡One-click import to Google Slides, automatically adjusting size and style.
  • 🔄Regular updates to match the latest 2025 design trends.

Try WorkPPT free by clicking the button below👇

⭐⭐⭐⭐⭐ Rated 4.8 by 1.3M Users

FAQs about Google Slides Presentation Creation

Q: Can I use Google Slides offline?

A: Yes. Just enable Offline mode in Chrome (Drive Settings > Enable Offline). Once set up, you can edit your slides without an internet connection.

Q: How do I import a PowerPoint file to Google Slides?

A: Yes! You can upload and convert your PowerPoint to Google Slides, just go to Google Drive > right-click > select Open with Google Slides. After importing, you can edit and share it easily, with very high compatibility.

Q: How many slides should my presentation have?

A: A common rule of thumb is one slide per minute. So for a 15-minute talk, aim for around 12–15 slides.

Q: What common mistakes should I avoid?

A: Avoid too much text, poor color contrast, excessive animations, low-quality images, unclear structure, and slides that don’t match your script.

💬 Conclusion:

Google Slides brings a fresh approach to creating presentations: collaborative, data-friendly, shareable, and always up-to-date. From picking a template and refining your text to adding animations and sharing your slides, every step helps build a clear and well-paced story. By following the tips in this article, you can easily create a professional, modern, and visually appealing presentation.

⭐⭐⭐⭐⭐ Rated 4.8 by 1.3M Users