When creating a Google Slides presentation, inserting images is more than just dropping them in. Tricks like flipping, mirroring, and reflecting can make your visuals stand out. This article walks you through every method of how to flip an image in Google Slides, showing you simple steps to achieve a professional look.
Can You Flip an Image on Google Slides
Yes, absolutely! Google Slides has a built-in feature that lets you flip images. You can flip them horizontally to create a mirror image from left to right, or vertically to flip them upside down. Let’s go through the official, step-by-step methods for how to mirror an image in Google Slides.
How to Flip an Image on Google Slides with Arrange
Using the Arrange option in the top menu is the official, most accurate way to flip an image, and it’s the method most users rely on. It’s the best choice for achieving a perfectly mirrored result.
Step 1: Open your Google Slides presentation and go to the slide with the image you want to flip. Click on the image to select it.
Step 2: Click the “Arrange” tab at the top, then choose “Rotate” from the dropdown menu.

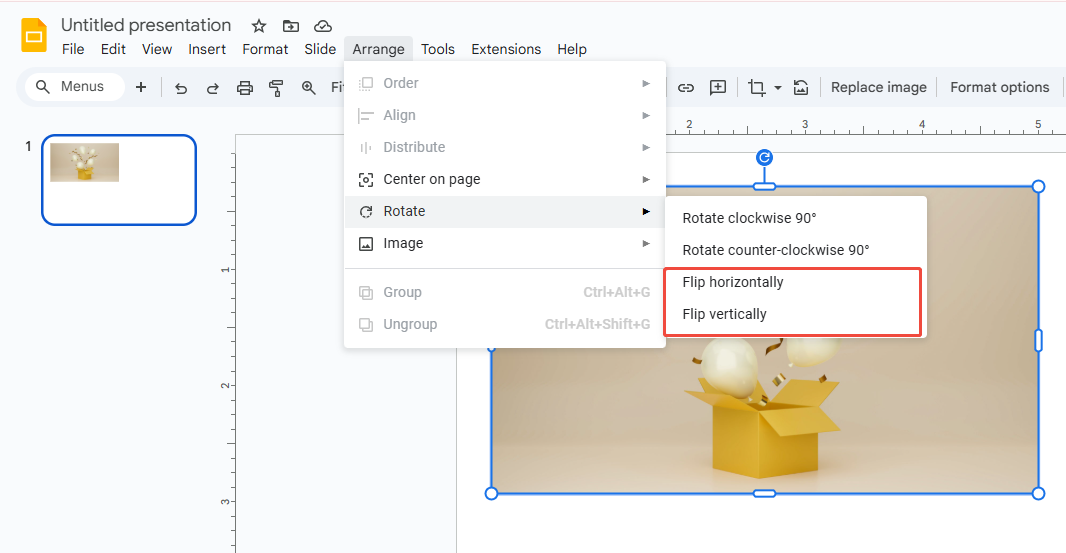
Step 3: Pick the flip direction and confirm:
- Flip horizontally: mirrors the image left to right.
- Flip vertically: flips the image upside down.
Step 4: Drag the image to adjust its size and position until it looks just right.
If you prefer making detailed tweaks using the sidebar, the “Format options” panel makes it easier. Try these steps:
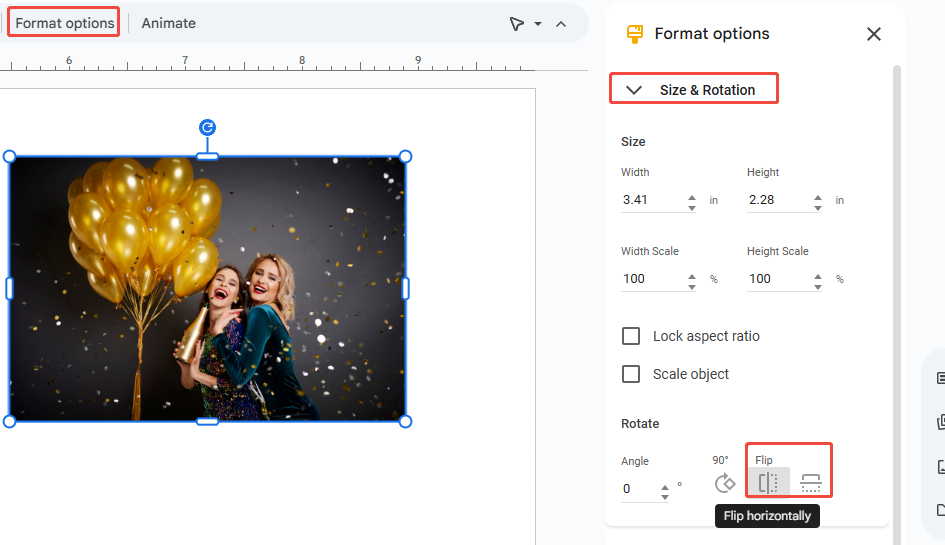
Step 1: Select your image and click “Format options” at the top.
Step 2: In the right-hand sidebar, open “Size & Rotation”, then check “Flip horizontally” or “Flip vertically” to flip your image.

How to Flip an Image in Google Slides via Corner Drag
Since the professional way is using the menu, can the more common method of dragging with a mouse flip an image? The answer is yes! This quick little trick doesn’t use the rotation handle, it flips the image by resizing it, creating a fast mirror effect.
Step 1: Open your Google Slides and select the image you want to flip. The image border will turn blue.
Step 2: Click and hold one of the blue corner handles (any corner will do, but not the circular rotation handle on top).
Step 3: Drag the corner in the opposite direction, toward the edge across from it, until the cursor passes the opposite side of the image. For example, drag the right-middle corner toward the left until it goes past the left edge.

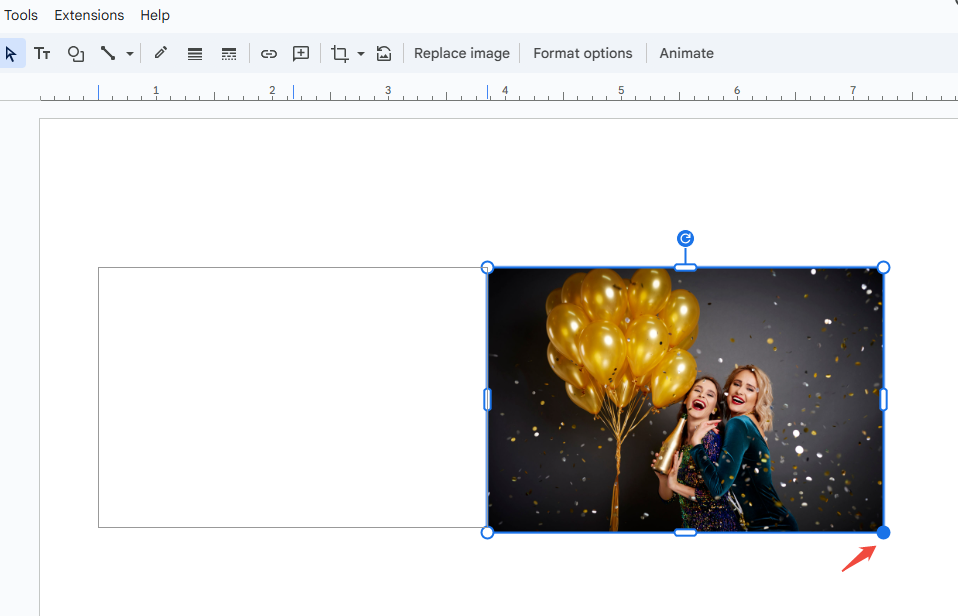
Step 4: You’ll see the image outline follow your cursor. Once you’ve dragged far enough, release the mouse. The image will automatically flip in that direction, creating a mirrored effect.
This method essentially uses negative scaling. When you drag a corner of the image past its opposite side, Google Slides flips the image by scaling its width to a negative value.
However, be careful: if you don’t hold the Shift key, the image may stretch or squash while flipping, changing its aspect ratio.
Advanced Techniques of How to Flip Images in Google Slides
Once you’ve mastered the basics of how to mirror an image in Google Slides, it’s time to explore more advanced techniques. In Google Slides, images rarely stand alone, they often come with borders, shadows, or text. Simply flipping an image could ruin your carefully designed layout.
But once you master these three advanced flipping techniques, you can handle 99% of image flipping challenges and make your design work much smoother.
1. Flipping Multiple Objects
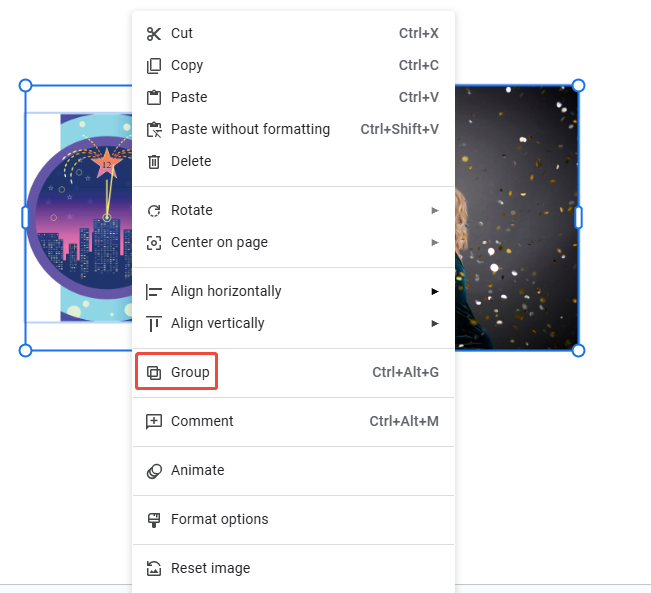
If your Google Slides has images grouped with borders, shadows, or other effects, flipping just the image will mess up the layout. The best way is to use the grouping feature.
Step 1: Hold down the Ctrl key and click on all the elements you want to include: images, shapes, shadows, etc.
Step 2: Right-click any of the selected elements and choose “Group” from the menu. You can also use the shortcut Ctrl+Alt+G (Windows) or Cmd+Option+G (Mac). A blue border will appear around the group, showing that they are now treated as a single object.

Step 3: Select the grouped object, go to “Arrange > Rotate”, and pick the flip option you want.

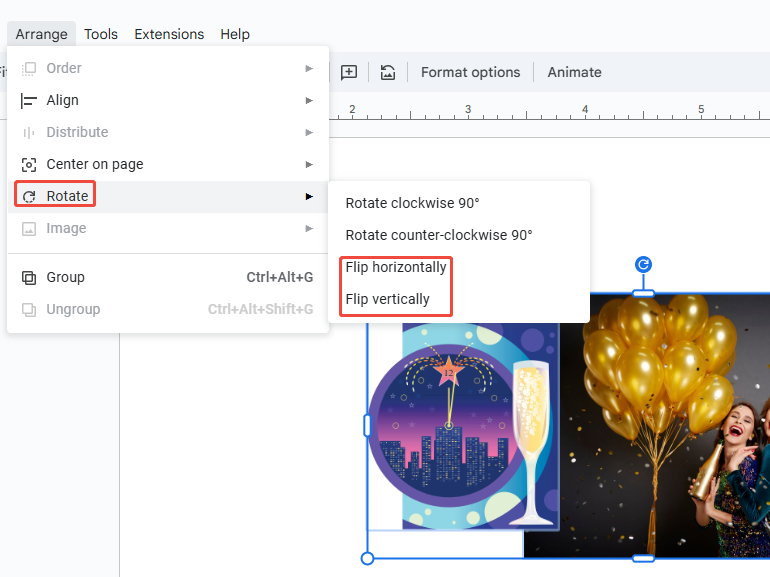
All elements in the group will now flip together perfectly, keeping their positions relative to each other unchanged.
2. Mirror Images with Text
If you flip a grouped image that has a separate text box on top, you’ll notice the text gets mirrored too, turning into unreadable gibberish.
Step 1: First, check if the image and text are grouped. If they are, right-click and choose “Ungroup”.

Step 2: Select only the image, then flip it horizontally or vertically as needed.
Step 3: If the text box has been mirrored, go to “Format options > Size & Rotation” and reset the rotation angle to 0.
Step 4: Move the text box back onto the flipped image and adjust its position so it looks neat and is easy to read.
Remember, text is the key to conveying information, so always make sure it remains readable.
3. Flipping Images within a Shape
When an image is used as a fill inside a shape, flipping it becomes trickier. Google Slides usually flips the entire shape, but the image itself doesn’t move the way you want.
Step 1: Click the image that’s been cropped into a custom shape, like a circle.
Step 2: Click the crop icon on the top toolbar to enter crop mode.
Step 3: In crop mode, you’ll see the image’s original shape.
- Outer handles: adjust the size and outline of the shape mask.
- Inner handles: move or resize the picture inside the shape.
Step 4: With the image still selected, go to “Arrange > Rotate” and choose the flip option. This flips the picture inside the shape.
Step 5: When you’re done, click anywhere on the slide to exit crop mode.
This way, you can mirror the content inside without changing the image or the shape mask itself.
Try WorkPPT to Save Your Slide Creation Time!
By now, you might be thinking: “Why is something as simple as flipping an image so complicated and time-consuming?” And honestly, for busy professionals who care about efficiency and polish, your time is better spent on your content and delivery—not on tiny layout tweaks.
If you don’t want to waste hours on formatting, alignment, and design, tools like WorkPPT AI Slides Maker can help. It uses AI to turn your topic into ready-to-use slides in minutes, freeing you from all the tedious work of fixing colors, spacing, and layout.

- AI-powered design: AI reviews your input and turns it into polished, professional-looking content.
- Fast creation and styling: It drastically cuts the time from a rough idea to a clean, well-designed result.
- Seamless Export: Export presentations to both Google Slides and PowerPoint without formatting issues.
- Work smarter with better focus: AI handles the repetitive, time-consuming design tasks for you.
- Less busywork, more impact: You can put 80% of your energy into refining your message and practicing your presentation.
⭐⭐⭐⭐⭐ Rated 4.8 by 1.3M Users
FAQs about Flipping an Image on Google Slides
Q: Why can't I flip an image left-to-right by dragging the rotate handle?
A: The rotate handle only rotates an image — it doesn’t flip it. If you want to mirror it horizontally, you need to use the actual flip tool: Arrange > Rotate > Flip horizontally.
Q: Why does my image look blurry after flipping?
A: Flipping an image in Google Slides doesn’t reduce its quality. If it looks blurry, you probably stretched the image after flipping, which enlarges the resolution and makes it look soft. Always use a high-resolution original, and check the Format options > Size settings after flipping.
Q: Can I flip an image in the Google Slides mobile app?
A: No. The mobile app only supports basic actions like moving and resizing. If you need to mirror an image, you’ll have to switch to the desktop browser version.
Q: Why does my image look off-center after flipping?
A: If the image wasn’t centered to begin with or you’ve cropped it before, flipping can make the layout look uneven.
💬 Conclusion:
Learning how to flip image in Google Slides is a simple way to upgrade your slide design. Instead of just placing images on a page, you can create clean, balanced layouts that look more intentional. Give it a try, your slides will instantly feel more polished and engaging.
At the end of the day, a presentation is all about delivering your message clearly. Let WorkPPT handle the repetitive design work and generate clean, professional slides for you with one click. Work smarter, save time, and boost your productivity.
WorkPPT helps you focus on content and deliver professional presentations quickly.
