author image

Have you ever wondered how to make PowerPoint vertical instead of the usual horizontal look? Sometimes, a vertical (portrait) slide fits your needs better—think posters, certificates, or mobile presentations.
In this guide, you’ll learn when to rotate slides in PPT, how to change your slide orientation step by step, and get helpful tips for designing in this format. Let’s begin!

Changing your slide orientation in PowerPoint is easier than you think. Here’s a step-by-step process to turn your slides from the default landscape (horizontal) mode to portrait (vertical) mode.

Step 1: Open Your PowerPoint Presentation

Start by opening the PowerPoint file you want to change. You can use a new or an existing file.

Step 2: Go to the “Design” Tab

At the top of the PowerPoint window, you’ll see several tabs. Click on the one labeled “Design.” This tab holds options for themes, slide sizes, and more.

Step 3: Click “Slide Size”

On the right side of the “Design” tab, you will find a button called “Slide Size.” Click it. A drop-down menu will appear.

Step 4: Choose “Custom Slide Size”

In the menu, select “Custom Slide Size.” This opens a new window where you can define your slide’s dimensions and orientation.

custom slide size on ppt

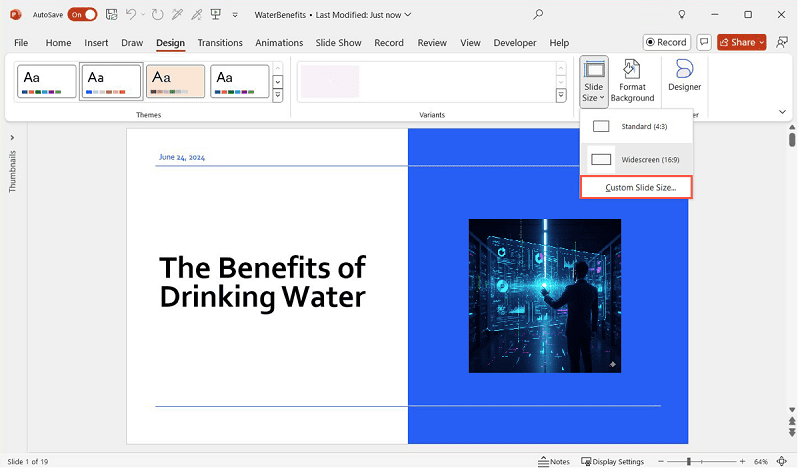
Step 5: Pick “Portrait” Orientation

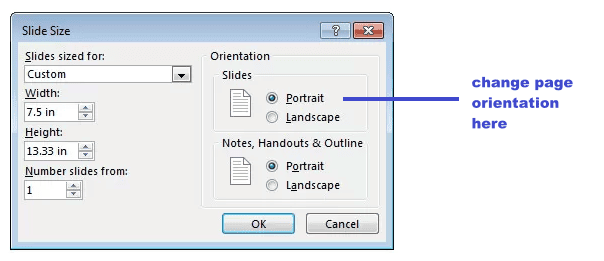
In the “Custom Slide Size” window, you’ll see options for “Slides sized for,” “Width,” “Height,” and “Orientation.” Look for the “Orientation” section. Here, you can set orientation for both “Slides” and “Notes, Handouts & Outline.”
  • Under “Slides,” select “Portrait.”
  • change powerpoint to portrait

  • (Optional) You can also adjust the size (e.g., A4, Letter, custom).

Step 6: Click “OK”

After selecting “Portrait,” click “OK.” PowerPoint will ask if you want to maximize the fit or ensure fit.
  • Maximize: Your slide content will stay the same size, but may go off the slide.
  • Ensure Fit: PowerPoint will shrink your content to fit the new orientation.
Usually, “Ensure Fit” is the safer choice.

Step 7: Adjust Your Content

Your slides are now vertical! But you may need to rearrange text, images, and shapes so they look good in the new layout.
[You May Also Like]: How to Revise Google Slides Dimensions?

Important Tips and Common Issues of Rotating Slide in PowerPoint

Changing slide orientation in PowerPoint is simple, but there are some things you should keep in mind.

PowerPoint Slide Rotation Tips

A common question is: “Can I rotate just one slide to portrait in my presentation?”
Unfortunately, PowerPoint applies slide orientation to the whole presentation—not just one slide.

Workaround:
If you need both portrait and landscape slides, create two separate presentations (one in each orientation). Save slides as PDFs, then combine the PDFs using a PDF editor.

Design Tips: Adapting Your Content for Portrait Slides

Portrait slides have a different feel from landscape slides. Here are some tips to make them look great:
  • Use Vertical Space Wisely: Arrange content top to bottom rather than left to right.
  • Break Up Text: Use more slides with less text on each.
  • Resize Images: Use tall, narrow images instead of wide ones.
  • Align Content: Center your main message, or use columns for lists.
  • Font Size: Make sure your text is big enough to read, since the slide is narrower.
  • Consistent Margins: Keep enough space on the sides for a balanced look.

Common Issues to Make Powerpoint Landscape

1. Content May Shift or Resize

When you change from landscape to portrait, the shape of your slide changes. Some items may not fit well. Check every slide and adjust:
  • Text boxes may overflow.
  • Images may get stretched or squished.
  • Charts and tables may need resizing.

2. Slide Master Layouts

If you use custom slide masters or layouts, you’ll need to check and possibly redesign them for portrait mode.

3. Animations and Transitions

Animations and transitions you set up before may look different. Test them after switching orientation.

4. Printing and Exporting

Before printing or saving as PDF, check your slides in “Print Preview” to make sure the layout looks good.

Comparing Landscape and Portrait Modes

Should you always use portrait mode? Not always. Here’s how the two modes compare:
FeatureLandscape (Horizontal)Portrait (Vertical)
DefaultYesNo
Best ForTraditional presentations, screensPosters, certificates, printouts
Screen FitFits most projectors/monitorsFits mobile screens, print media
ContentWide tables, images, chartsVertical infographics, lists

In short:
Use landscape for most presentations, especially when presenting on a screen. Use portrait for printed materials, posters, or when your audience will view on mobile devices.

AI PPT Tool for Fast Presentation Generation

While PowerPoint lets you change slide orientation, sometimes you need to create a presentation quickly and don’t want to worry about design. That’s where AI tools like WorkPPT come in.

What is WorkPPT?

WorkPPT AI Presentation Maker is an AI-powered presentation maker. You simply enter your topic or upload content, and workppt generates a professional-looking PowerPoint presentation in seconds.

workppt screenshot

💡 Key Features:

Still, if you need a fast, beautiful slide deck for a business pitch, lesson, or report, workppt is a great choice. After generating your slides, you can download and further edit them in PowerPoint if you need to adjust the orientation or tweak the design.

FAQs About How to Change PowerPoint to Portrait

Q1: Can I mix landscape and portrait slides in one PowerPoint file?

A: No, PowerPoint only allows one orientation per presentation. If you need both, create separate files and combine them as PDFs.

Q2: Will changing orientation mess up my content?

A: It might. Text and images may not fit perfectly after switching. Always review each slide and adjust as needed.

Q3: How to make PowerPoint portrait on Mac or online version?

To make PowerPoint portrait on Mac:
  1. Open your presentation in PowerPoint for Mac.
  2. Go to the Design tab.
  3. Click Slide Size > Page Setup.
  4. Under Orientation, select Portrait for Slides.
  5. Click OK and adjust your slide content as needed.

To make PowerPoint portrait in the online version:
  • PowerPoint for the web currently does not support changing slide orientation directly.
  • To use portrait slides, open your file in the desktop version of PowerPoint, change the orientation, and then save or continue editing online.

Q4: What if I want to print my slides as a poster?

A: Switch to portrait, set custom dimensions (like A4 or poster size), and check print settings before printing.

Q5: Is there a shortcut to change orientation?

A: No keyboard shortcut exists, but once you know where “Custom Slide Size” is, it only takes a few clicks.

Q6: Can workppt generate portrait slides?

A: Not at the moment. WorkPPT creates 16:9 landscape slides, but you can always adjust orientation in PowerPoint after downloading.

💬 Conclusion:

Steps of making portrait in PowerPoint is simple once you know where to look. Remember: vertical slides are great for posters, flyers, and mobile views, while landscape is best for most presentations. Adjust your content to fit the new layout, and check everything before presenting or printing.

If you want to save time and get stylish slides fast, try using an AI tool like WorkPPT. While it generates slides in landscape only, it can give you a strong starting point for your next presentation.