This is the required first step to create your account and access all the tools.
Step 1: Locate the Sign Up button. Click the "Sign up" button below or other sign up button in the top right corner of the navigation bar.
Step 2: Click the "Continue with Google" button to log in with your Google account.
2 After sign up, you can use the function now:
Generate an AI Presentation with WorkPPT
WorkPPT offers two powerful modes for AI generation. Click the method below that best suits your starting point to view the detailed, step-by-step instructions.
Mode 1: Use a prompt
Type your topic, desired audience, and key takeaways (3-5 points) into the AI prompt box. For best results, specify the presentation's purpose (e.g., pitch, training, report).
Mode 2: Upload a file
Upload a document (e.g., a report, meeting notes, or an outline) that contains the core information. The AI will analyze the text to create a structured slide deck.
Mode 3: How to write a good prompt
"The Formula for Success." A good prompt is: [Topic] for [Audience] with [Goal/Purpose]. Example: "Create a sales pitch on our new SaaS product for small business owners to secure a follow-up meeting."
1 Mode 1. Generate AI presentation with text prompt
This method allows you to create a presentation instantly using a text command.
Step 1:Click "AI Slide" on the left navigation bar of your WorkPPT workspace.
Step 2:In the text box, provide a clear description of your presentation. Be sure to include the topic, target audience, and key outcome (e.g.,"Create a 10-slide quarterly sales report for the executive team, focusing on Q4 growth and 2026 projections."). Then, click the button to process your request.
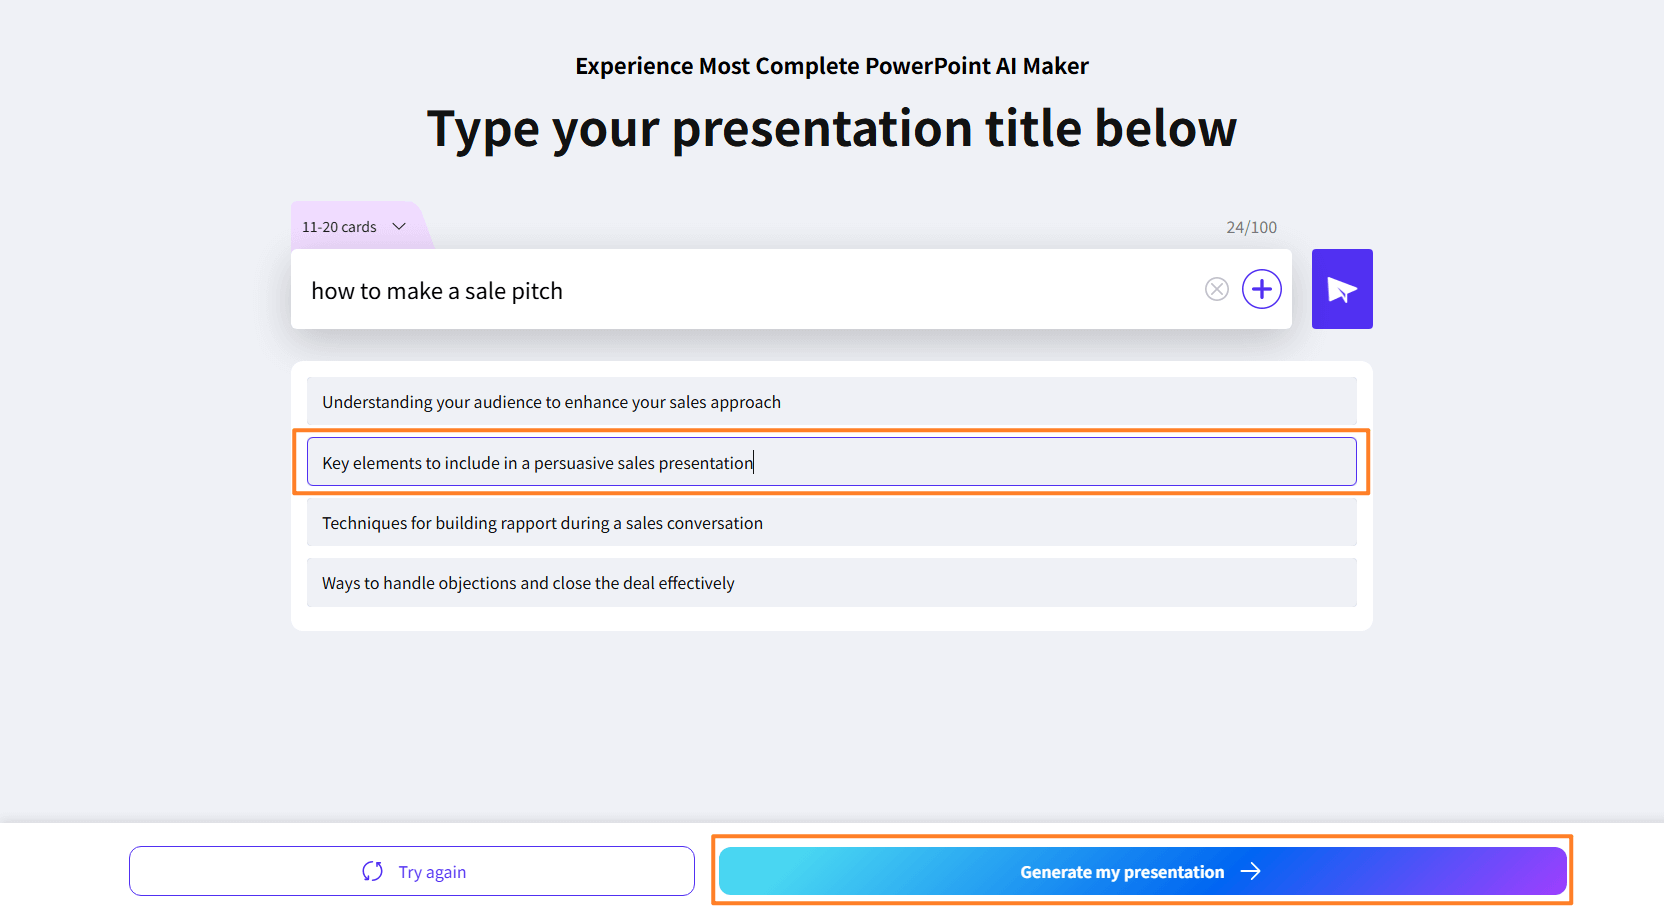
Step 3: Review and Generate the Slides. WorkPPT will instantly generate a presentation outline based on your prompt. Click on the outline sections to make any necessary edits or adjustments. Once satisfied, click "Generate my presentation" to create the full slide deck.
2 Mode 2. Upload files to generate AI presentation
With this mode, you can use your existing documents to create a structured presentation automatically.
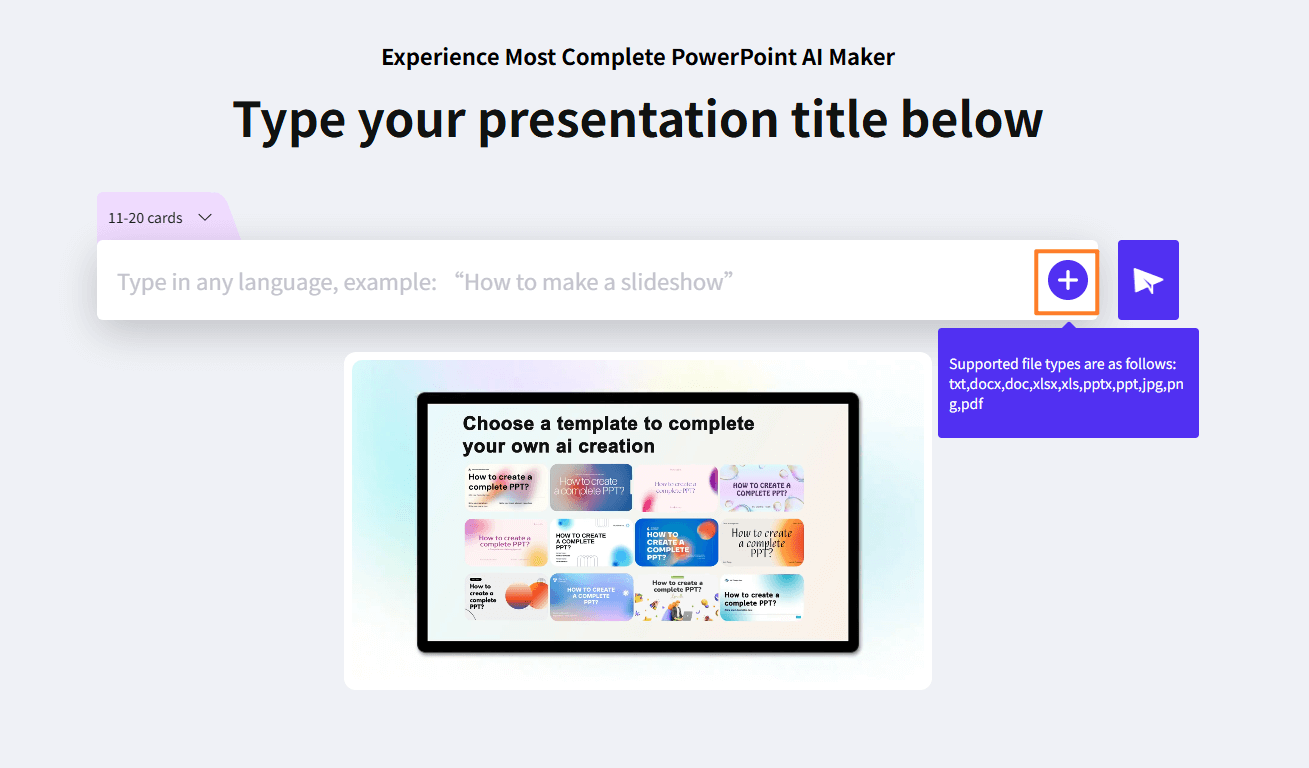
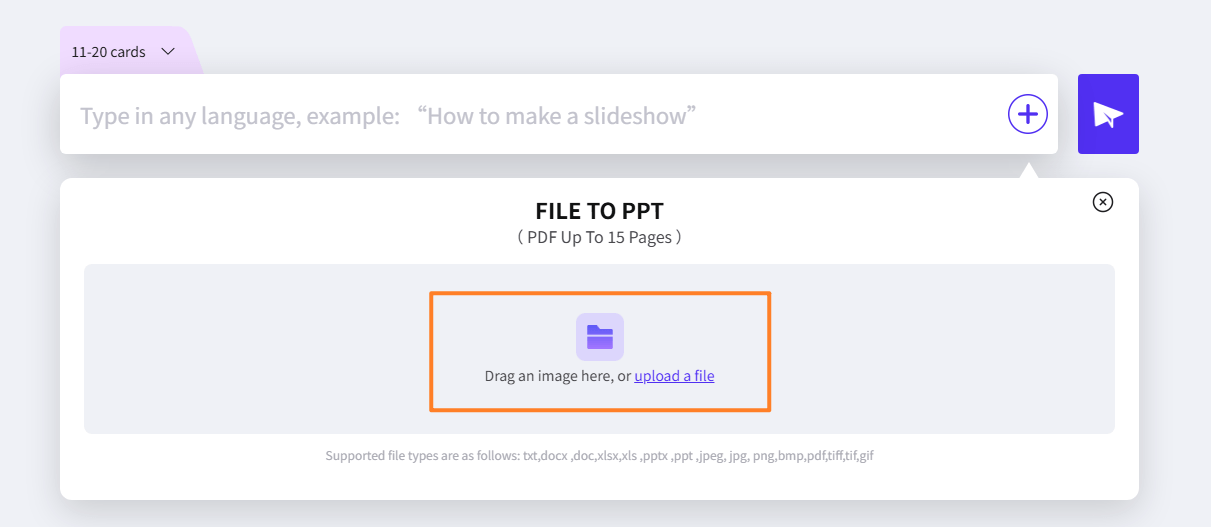
Step 1:Select File Upload. Click the button beside the text box to upload your file. Drag or click the "upload a file" text to upload your file to WorkPPT. We support file formats including txt, docx, doc, xlsx, pptx, ppt, jpg, png, pdf.
Step 2: Choose Your Source. Browse and select the document (e.g., Word, PDF, notes file) you want to convert into slides.
Step 3: Analyze and Structure. The AI will analyze the content. Review the suggested outline and make any necessary adjustments before confirming generation. Once satisfied, click "Generate my presentation" to create the full slide deck.
3 How to write a good prompt
Follow this formula for high-quality, relevant results.
Step 1: Define the Topic and Audience. Start with What and Who (e.g., "Presentation on Budget Planning for the Marketing Team.").
Step 2: Set the Goal and Tone. Add Why and How (e.g., "...to secure a 15% increase, using a persuasive and professional tone.").
Step 3: Specify Constraints (Optional). Include details like slide count or inclusion/exclusion of specific sections (e.g., "...must include a SWOT analysis slide.").
4 More tutorials of WorkPPT
How to Insert a New Slide on WorkPPT
You have two distinct ways to add new content blocks to your presentation structure: using a pre-designed layout (template) or adding a blank slide.
1 Way 1: Add template layout (recommended for quick structure)
This method ensures your new slide maintains the presentation's consistent design theme.
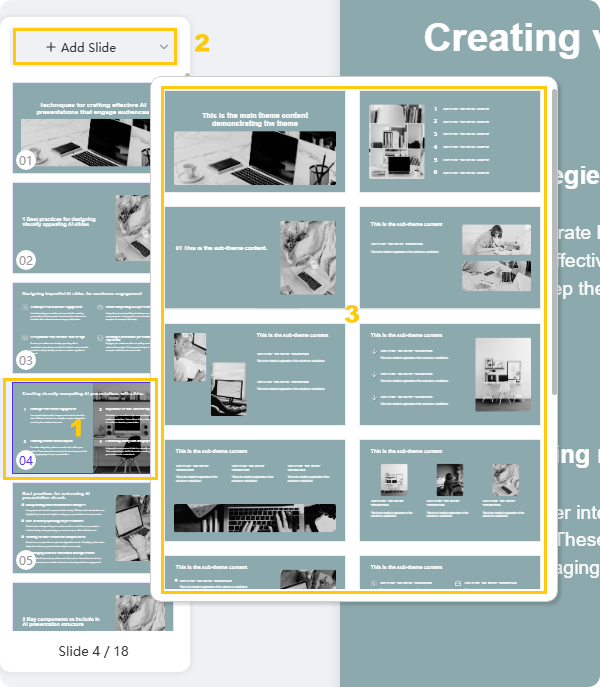
Step 1: Select Insertion Point. On the WorkPPT slides panel (left bar), select the slide after which you want the new slide to be inserted.
Step 2: Access Layouts.Click the "+ Add Slide" button, located on the top of the left sidebar.
Step 3: Choose and Apply Layout. Browse the available layouts. Choose the specific layout template (e.g., Title & Content, Comparison, Picture with Caption) that fits your content needs, and click it. A new slide with a consistent design theme will be added to your presentation.
2 Way 2: Add blank new slide (for custom design)
This method gives you a completely empty canvas for full customization.
Method A: Using Right-Click
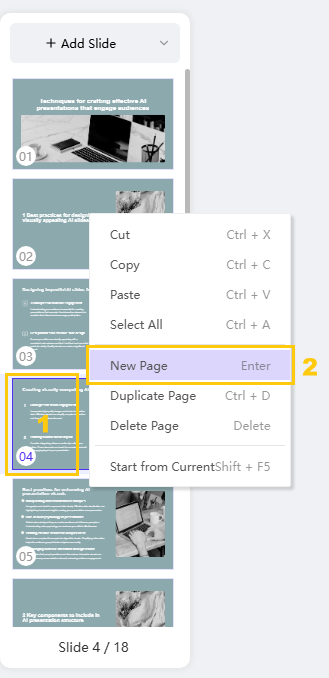
Step 1: Select Insertion Point. In the slide panel, select the slide after which you want to add the new page.
Step 2: Use Context Menu.Right-click on the selected slide and choose "New Page" from the pop-up menu.
Method B: Using the Edit Menu
Step 1: Select Insertion Point. In the slide panel, select the slide after which you want to add the new page.
Step 2: Access Menu.Go to the "Edit" option, usually found in the right corner of the main editing interface.
Step 3: Add Page.Select "Add Page" from the dropdown list.
3 More tutorials of WorkPPT
Edit Text on WorkPPT : Formatting, Styling, and Placement
In this section, you will learn how to add and modify text, including changing font, size, color, adding hyperlinks, and controlling placement.
1 A. Basic Text Styling
All basic editing actions begin by selecting the text you wish to modify. A dedicated floating toolbar will appear on the right side.
Function
Step 1: Select Text
Step 2: Action
Key Detail / Alternative
1. Change Text Font
Select the text within the text box.
Click the Font Name dropdown and select your desired font style.
Choose professional, highly readable fonts like Arial or Calibri.
2. Change Text Size
Select the text.
Click the Text Size number and choose a new size.
Alternatively, click the T+ (increase) or T- (decrease) icons on the toolbar for quick adjustments.
3. Change Text Color
Select the text.
Click the Text Color Icon and select a new color from the palette.
Use contrasting colors for better visibility.
4. Highlight Text
Select the text.
Click the Text Highlight Icon and choose the desired background color.
Useful for drawing immediate attention to keywords or phrases.
2 B. Special Formatting & Tools
5. Add Superscript and Subscript
Use this for scientific formulas (H₂O) or mathematical expressions (x²).
Step 1: Select Text. Select the specific character(s) you want to format (e.g., the '2' in H₂O).
Step 2: Apply Format. Click the Superscript (A²) or Subscript (A₂) icon on the right toolbar to adjust the text position.
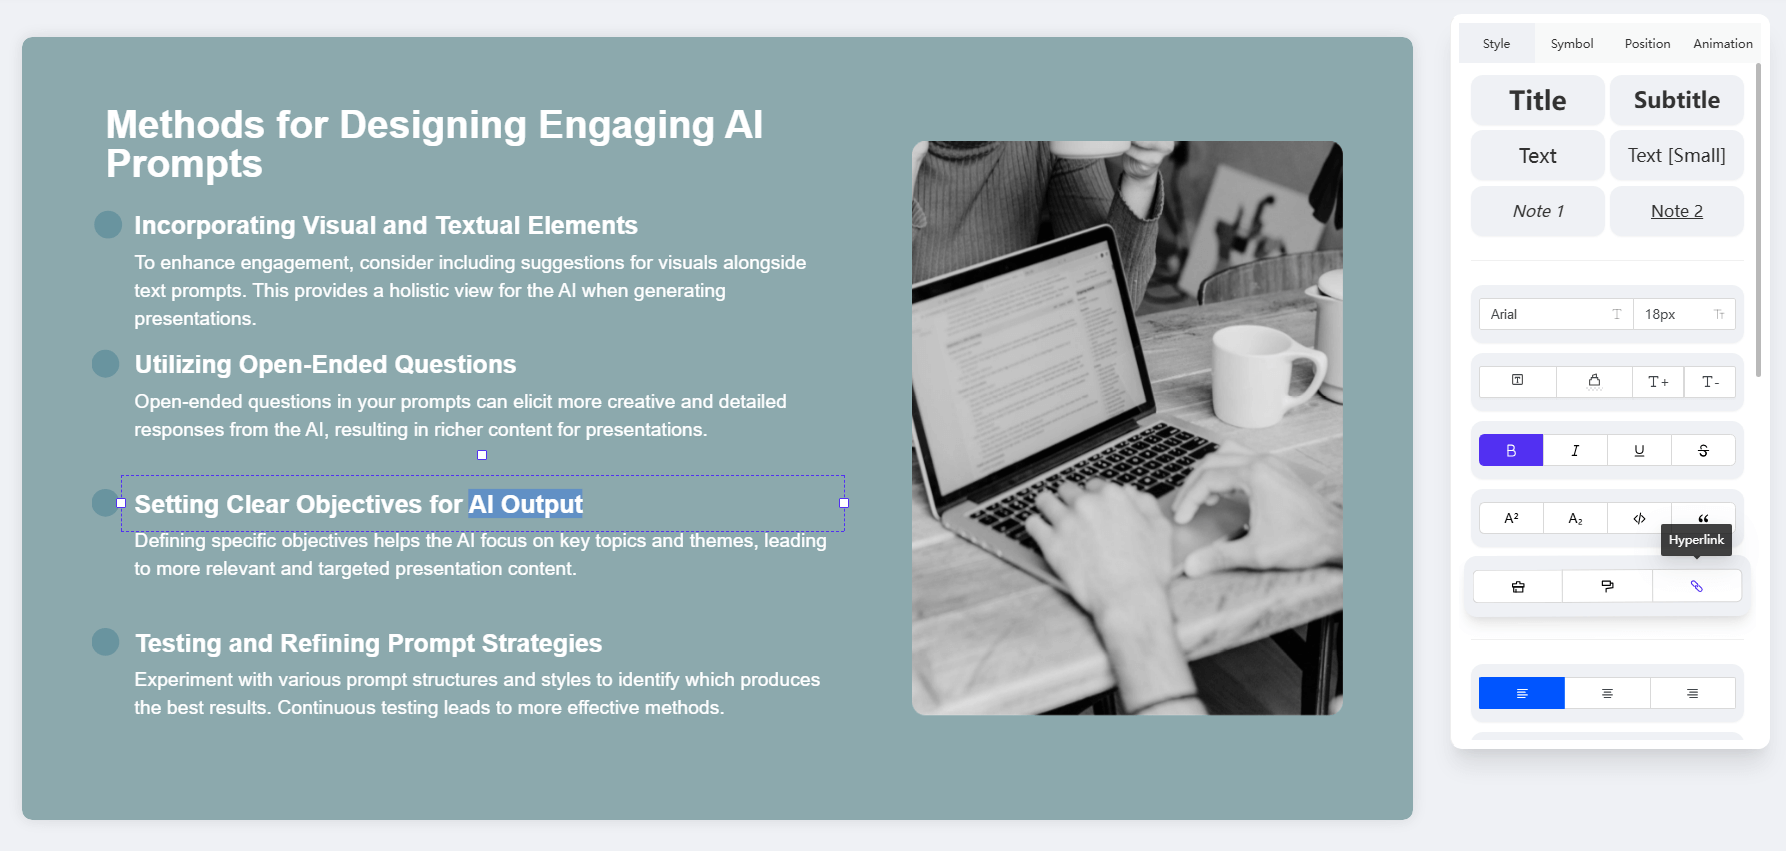
6. Add Hyperlink to Text
Link text to an external website or another slide.
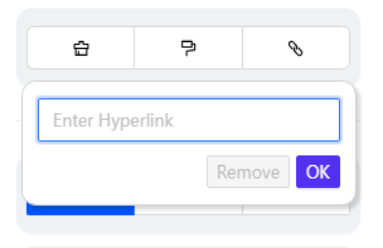
Step 1: Select Text. Select the words you want to turn into a link (e.g., "Click Here").
Step 2: Activate Link Tool. Click the Hyperlink Icon.
Step 3: Enter Link.Enter the destination URL or select the target slide, then click "OK."
Note: To remove a hyperlink, click the linked text and select "Remove" from the hyperlink tool menu.
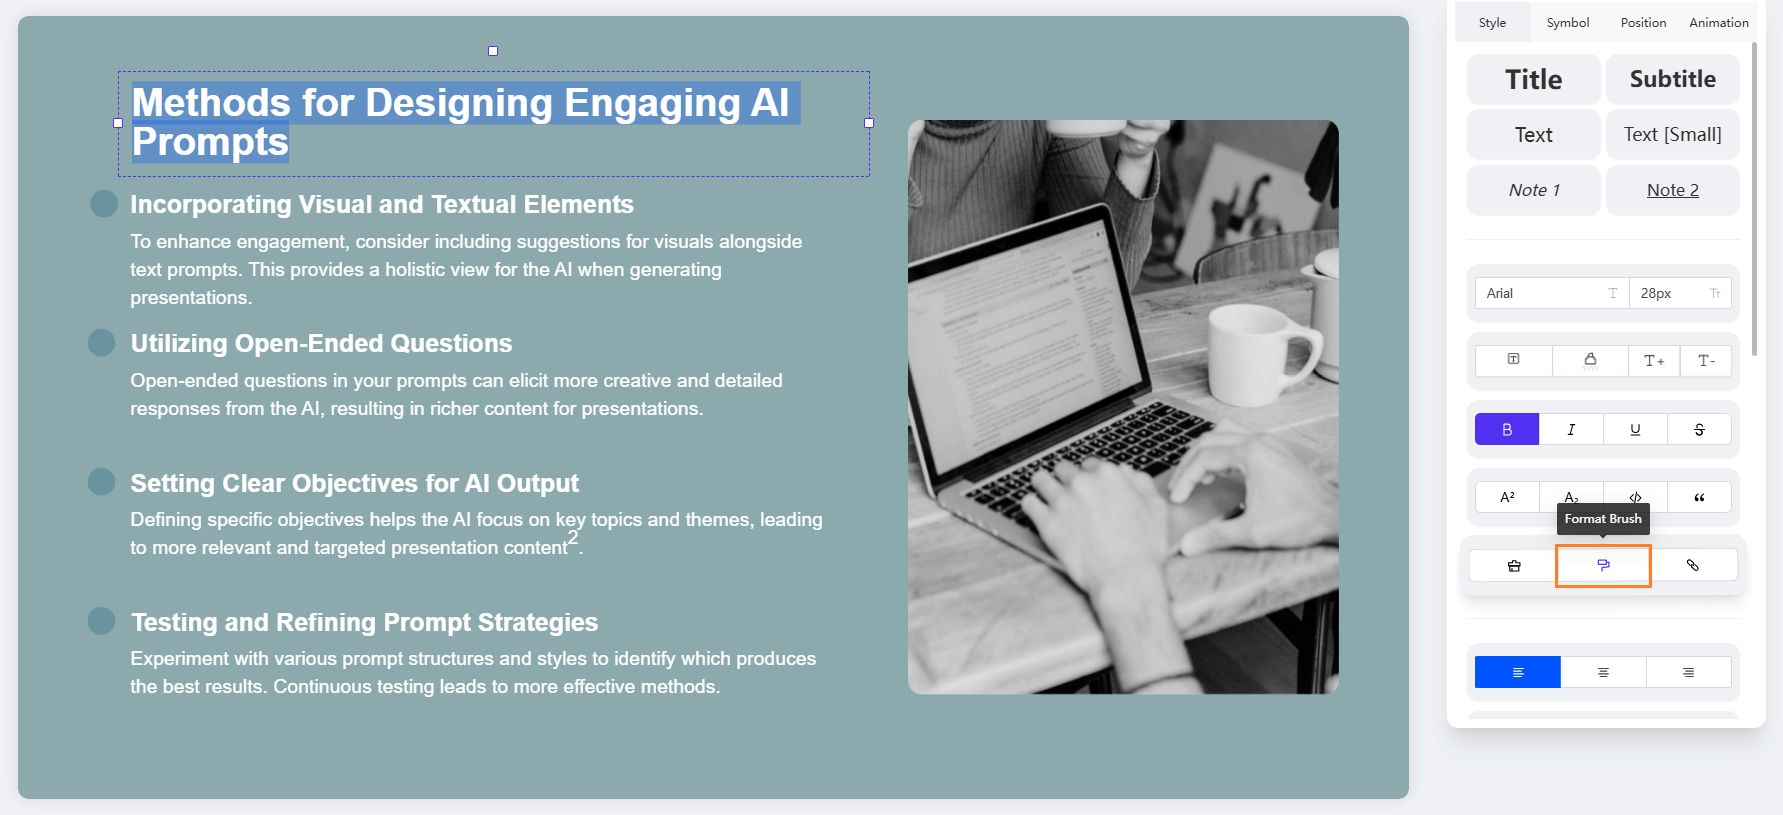
7. Use Text Format Brush (Format Painter)
Quickly copy and paste formatting (font, size, color, etc.) from one text section to another.
Step 1: Select Source Text. Select the text that has the formatting you want to copy.
Step 2: Activate Brush. Click the Format Brush (or Format Painter) icon on the right toolbar.
Step 3: Apply Format. "Brush" (click and drag over) the target text you need to apply the copied formatting to.
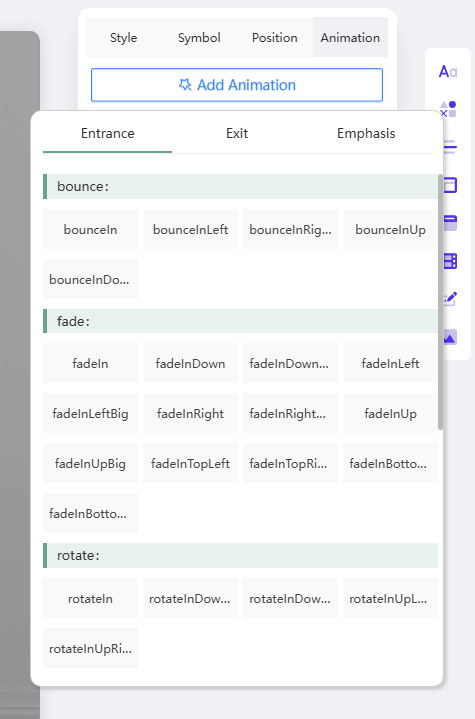
8. Add Animation to Text
Introduce text dynamically to your slide to control the audience's focus.
Step 1: Select Text Box. Click the border of the text box (or select the specific text) you want to animate.
Step 2: Go to Animation Panel. Click the "Animation" tab, typically found at the top of the editing area.
Step 3: Choose Effect. Select the desired entrance or emphasis animation (e.g., Fade, Fly In).
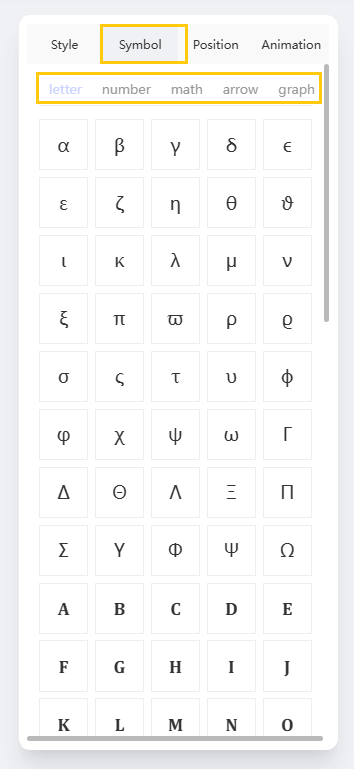
9. Add Math Character / Special Symbol
Insert characters that are not available on a standard keyboard.
Step 1: Activate Text Edit Area. Click where you want to insert the symbol.
Step 2: Access Symbols. Select the "Symbol" option on the top of the right toolbar.
Step 3: Insert Symbol. Choose the special character you need from categories like Letter, Number, Math, Arrow, or Graph.
3 C. Text Box Management
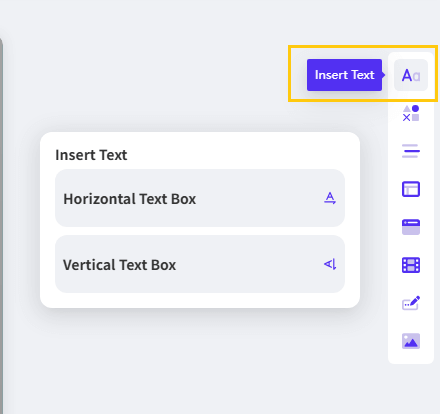
10. Add New Text Box
Insert new, independent blocks of text anywhere on the slide.
Step 1: Access Text Tool.On the right-hand toolbar, click the "Aa" icon.
Step 2: Select Orientation.Choose to insert a Horizontal or Vertical text box.
Step 3: Place and Type. Click on the desired area of the slide. The text box will be added, and you can begin typing your content immediately.
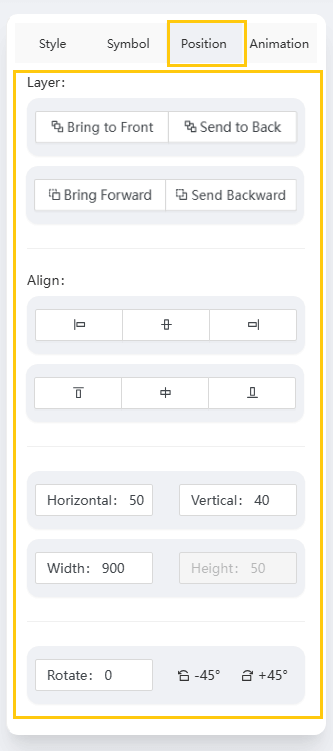
11. Change Layer, Align, and Position
Control the placement and stacking order of your text box relative to other elements (Images, Shapes).
Step 1: Select Text Box. Click the border of the text box you want to adjust.
Step 2: Access Management Tools. Locate the alignment and arrangement functions on the toolbar (often under an "Arrange" or "Format" menu).
Step 3: Apply Function.
Layer: Use "Bring to Front" or "Send to Back."
Align: Use standard alignment options (Left, Center, Right, Middle).
Position: Adjust the Rotation or move the text box precisely using numerical coordinates.
4 More tutorials of WorkPPT
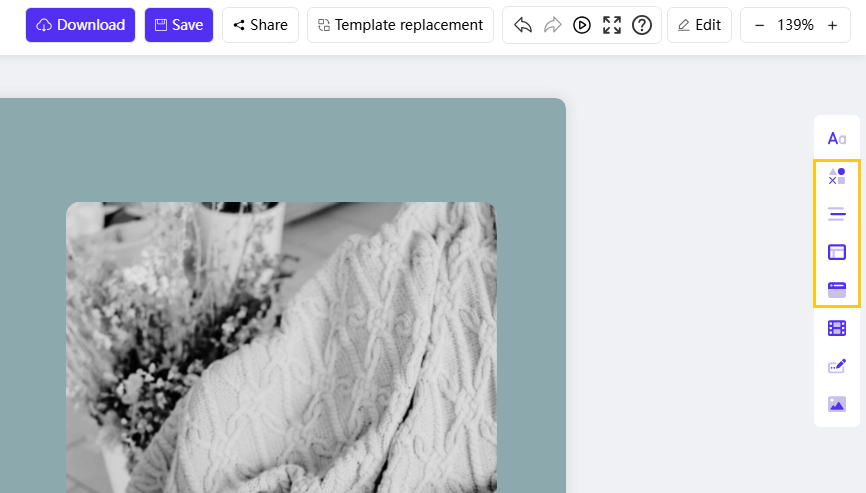
Insert Subjects: Shapes, Media, and Graphics
In this section, you will learn how to add and customize essential elements like shapes, tables, charts, images, and videos to your WorkPPT AI slides.
1 A. Graphics and Data Visualization
Function
Step 1: Access Tool
Step 2: Selection / Input
Step 3: Customization & Placement
1. Insert Shape
Click the Insert Shape Icon on the right toolbar.
Choose the desired shape (e.g., rectangle, circle, arrow).
Click on the slide to place it. Drag the handles to adjust size, or click the shape to modify fill color and border.
2. Insert Line
Click the Insert Line Icon on the right toolbar.
Choose the line style: straight, curve, or arrow.
Click and drag across the slide to draw the line. Use the edit options to change line thickness and color.
3. Insert Chart
Click the Insert Chart Icon on the right toolbar.
Select the appropriate chart type (e.g., Line Graph, Bar Chart, Pie Chart, Scatter Plot).
The chart will appear with sample data. Click the chart to edit the data source and change design/color scheme.
4. Insert Table
Click the Insert Table Icon on the right toolbar.
Select the required number of rows and columns (e.g., 3x5) by dragging the grid.
Click the table to input content. Use the Table Design options to change cell color, borders, and text alignment.
2 B. Media and Branding
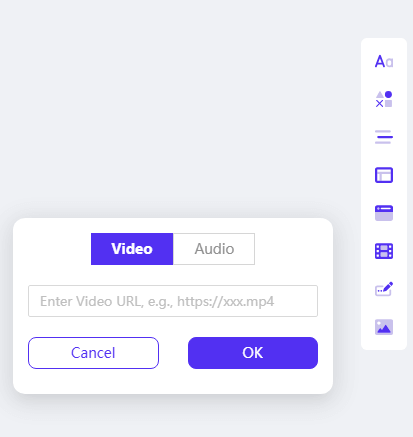
5. Insert Video/Audio
Embed external media directly into your slide.
Step 1: Access Media Tool. On the slide where you want to add media, click the Insert Audio and Video Icon on the right toolbar.
Step 2: Paste Link. Paste the direct link of the video (e.g., YouTube) or audio file into the designated field.
Step 3: Confirm Insertion.Click "OK." The media player will be embedded, allowing you to resize and position it.
6. Insert logo/watermark
Establish branding and security across your presentation.
Step 1: Access Logo Tool. Click the Insert Logo Icon on the right toolbar.
Step 2: Choose Type and Source.
Click the '+' area to upload your logo image.
OR Type text (e.g., "CONFIDENTIAL") to create a text watermark.
Step 3: Set Placement and Scope.Fix the size and position of the logo/watermark. Choose to Apply to current slide or Apply to all slides.
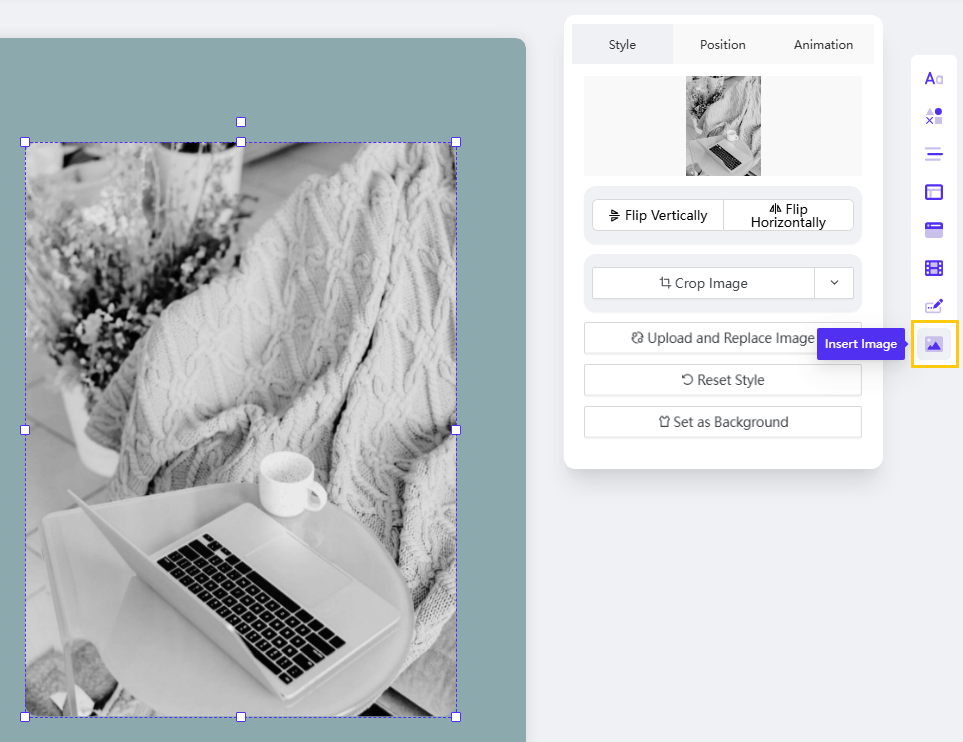
7. Insert image
Add high-quality visuals from your device.
Step 1: Access Image Tool.On the slide where you want to add an image, click the Insert Image Icon on the right toolbar.
Step 2: Upload Picture. Choose the picture file from your local device.
Step 3: Adjust and Customize. Drag to adjust the size or position of the image.
*Customization: Click the image to access tools allowing you to flip, crop, replace, set as background, change layer position, or add animation.
3 More tutorials of WorkPPT
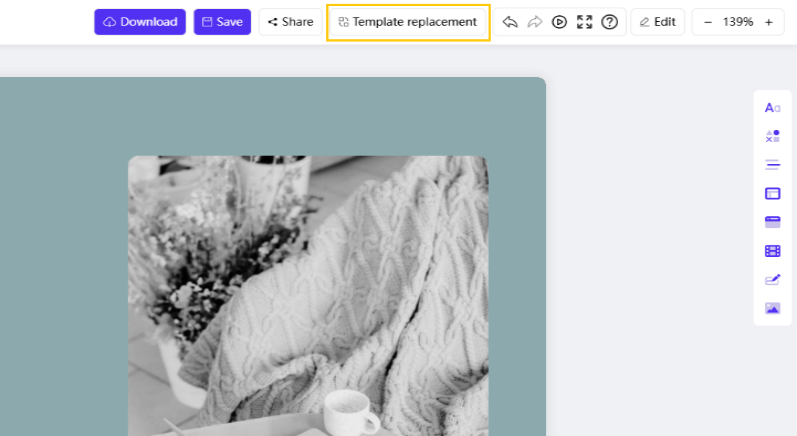
How to Replace Template on WorkPPT
This function allows you to completely change the aesthetic and design of your presentation while automatically adapting your existing content.
Step 1:On the main top toolbar, click the "Template replacement" option.
Step 2: Browse and Select. Browse the available library of design templates. Click on the template that matches the style you wish to adopt.
Step 3: Auto-Regenerate Layout. Confirm your selection. WorkPPT will automatically apply the new design and regenerate the content layout to fit the new template's structure and formatting.
Note: Use this tool when you need a quick visual overhaul of your entire presentation without manually redesigning every slide.
1 More tutorials of WorkPPT
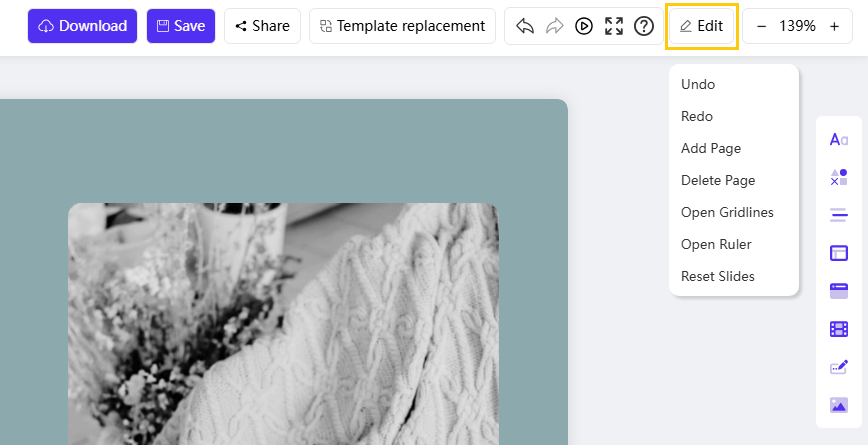
Basic Edit Tools on WorkPPT
The Basic Edit Tools provide essential functionality for managing your presentation structure and editing workspace. All these functions are accessible via the "Edit" tab on the top toolbar.
Step 1: Access the Edit Tab.Click the "Edit" tab on the main top toolbar.
Step 2: Choose Your Function. Select the required function from the dropdown list that appears.
Function
Purpose
Step-by-Step Action
Undo / Redo
Quickly revert or restore the most recent action taken (e.g., deleted text, moved object).
Select "Undo" or "Redo" from the "Edit" dropdown list.
Add Page / Delete Page
Control the slide flow of your presentation.
Select "Add Page" to insert a new blank slide, or "Add Page" to remove the current selected slide.
Open Gridlines
Display non-printing horizontal and vertical lines to help align objects precisely.
Select "Open Gridlines" to toggle the visibility of the alignment grid.
Open Ruler
Display horizontal and vertical measurement tools to accurately position elements on the slide.
Select "Open Ruler" to toggle the visibility of the rulers on the slide perimeter.
Reset Slide
Revert the current slide back to its original template layout and formatting, discarding manual edits.
Select "Reset Slide" to restore the slide's default state.
1 More tutorials of WorkPPT
How to Add Animation/Transitions on WorkPPT
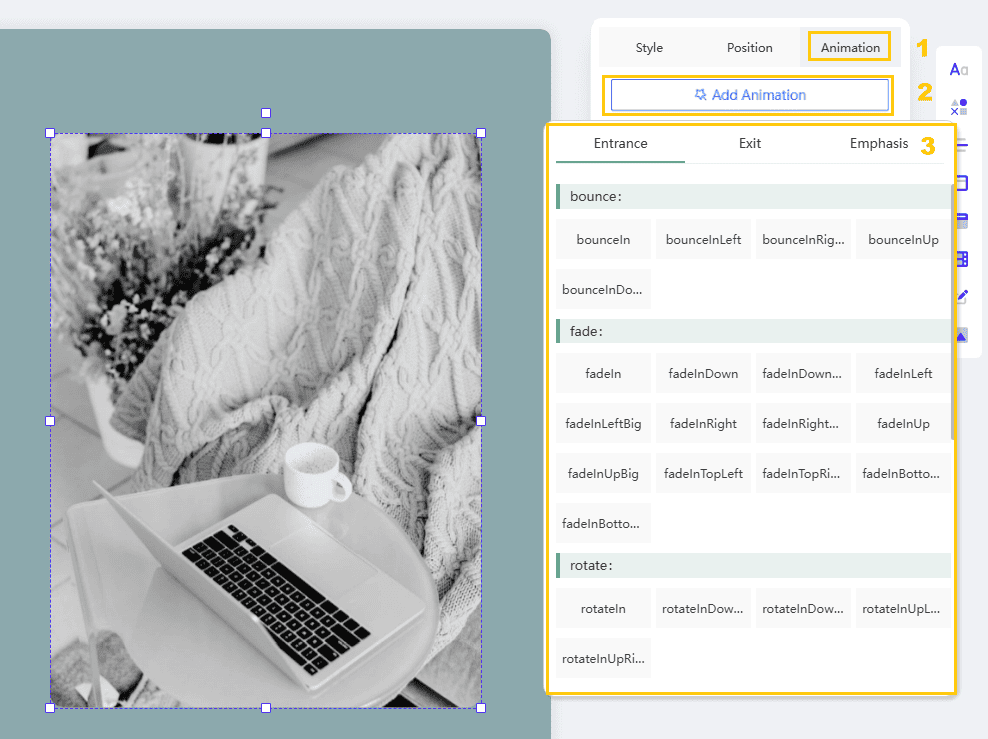
1 Add Animation
Adding animation brings movement to individual objects (text, images, shapes) to emphasize points and control the flow of information on your slide.
Step 1: Select the Object. Click the specific text box, image, shape, or chart that you wish to animate.
Step 2: Access the Animation Panel. Locate and click the "Animation" tab or icon, which is typically situated at the top of the right-hand editing toolbar area.
Step 3: Choose the Effect. Browse the list of available animations (e.g., Fade, Fly In, Zoom). Click the desired animation effect to preview and select it.
Step 4: Set the Timing (Optional). In the Animation settings panel, you can set how the animation begins:
Start: Choose "On Click" (requires a mouse click) or "With Previous" / "After Previous" (automatic timing).
Duration: Adjust how fast the animation plays.
*Tip: Use entrance effects sparingly and consistently to maintain a professional look.
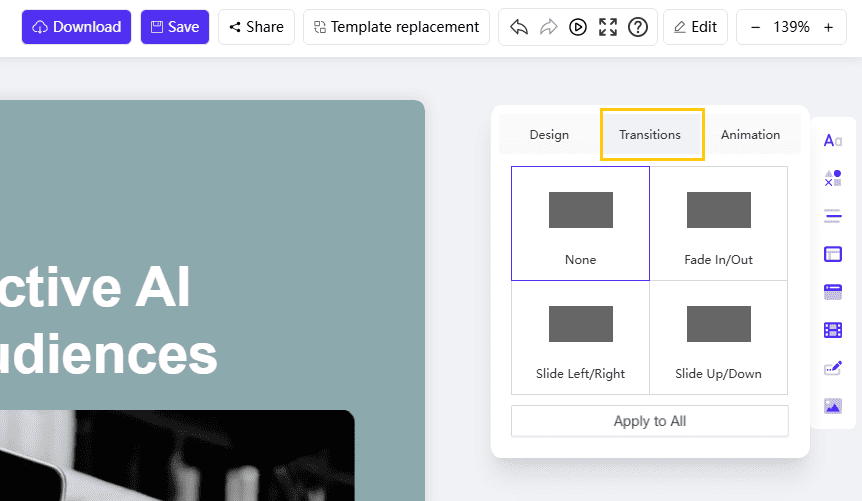
2 Add transitions
Click the blank area of the slide background, click the transition on the top of the right tool bar. You can choose 6 transitions for the show of the slides.
Slide transitions control the visual effect that occurs when moving from one slide to the next during your presentation show.
Step 1: Select the Slide. Click the blank area of the slide background (or select the slide thumbnail on the left panel) to ensure you are editing the slide itself, not an individual object.
Step 2: Access Transition Tools.Click the "Transition" option, typically located on the top of the right-hand editing toolbar area.
Step 3: Choose the Effect. Browse the available transition effects. You can choose from up to 4 distinct transitions for your slide show.
Step 4: Preview and Apply. Click an effect to preview it. Once satisfied, set the timing (if applicable) and choose whether to apply it to just the current slide or all slides in the presentation.
*Note: Transitions affect the entire slide, while animations affect individual objects on the slide.
3 More tutorials of WorkPPT
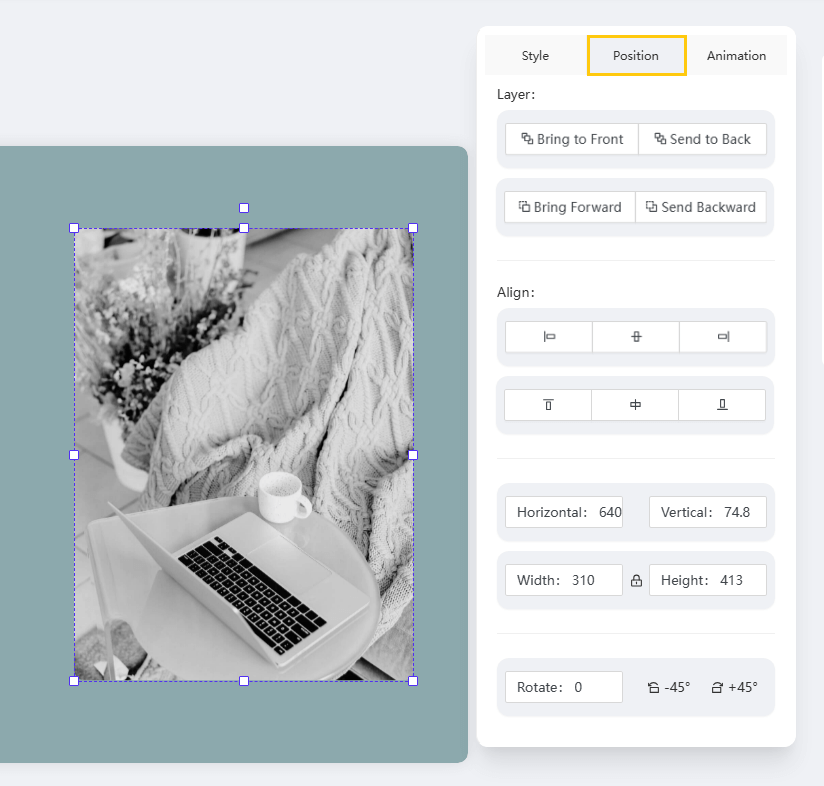
How to Change Position/Layer on WorkPPT
This functionality allows you to control the exact placement, orientation, and stacking order of individual objects (text, images, shapes, etc.) on your slide.
Step 1: Select the Object. Click the specific object (text box, image, or shape) you want to adjust.
Step 2: Access the Position Tool. Locate and click the "Position" icon or tab, typically found at the top of the right-hand editing toolbar area.
Step 3: Adjust Alignment and Orientation. Use the available options to:
Align: Precisely center the object on the slide or align it relative to other objects (e.g., Left, Center, Middle).
Rotate: Change the orientation of the object (e.g., Rotate 90 degrees, Flip Horizontal).
Step 4: Adjust Layer Order. Use the layering tools to control the object's stacking:
Bring to Front: Moves the object to the top layer, visible over all others.
Send to Back: Moves the object to the bottom layer, placing it behind all others.
1 More tutorials of WorkPPT
How to Change WorkPPT Background
This functionality allows you to customize the visual canvas of your slide by modifying the background fill and applying comprehensive themes.
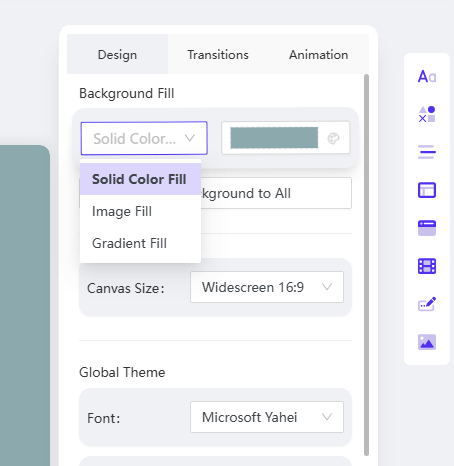
1 Custom Background Fill (Color/Image)
Step 1: Access Background Settings. Click an empty area on the slide background to select it.
Step 2: Choose Fill Type. Locate the "Background Fill" options (usually in the right-hand editing toolbar). Choose your preferred style:
Image Fill: Select an image from your device to use as the background.
Gradient Fill: Choose two or more colors to create a gradual color blend.
Solid Color: Click the Color Tab and select a single color.
Step 3: Apply to All (Optional). If you wish to apply the exact custom background to your entire presentation, click the "Apply to All Slides" button.
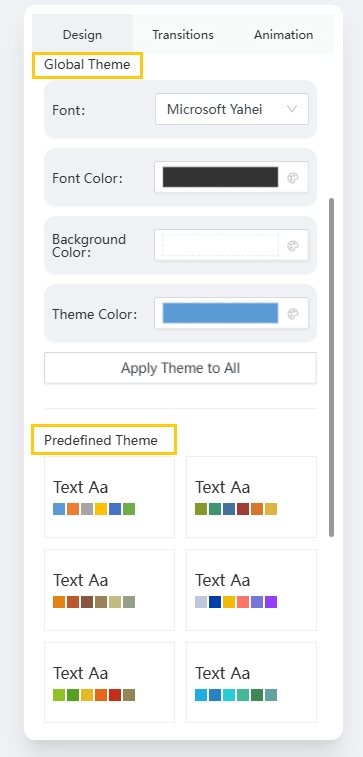
2 One-Click Theme Customization
WorkPPT allows you to quickly adjust the presentation's overall look.
Step 1: Locate the Theme/Design panel. Click the blank area of the slide background. Drop down and find the area of Global Theme and Predefined Theme.
Step 2: Customize Global Style. You can instantly change:
Theme: Apply a new aesthetic framework.
Font Color: Adjust the primary text colors.
Theme Color: Modify the dominant color palette used across all design elements.
Step 3: Final Application. To implement the changes globally, click "Apply Theme to All".
3 More tutorials of WorkPPT
How to Change/Replace Image on WorkPPT
WorkPPT automatically adds images to your slides. If you need to swap a placeholder image for your own custom visual, follow these steps.
1 Replace Image
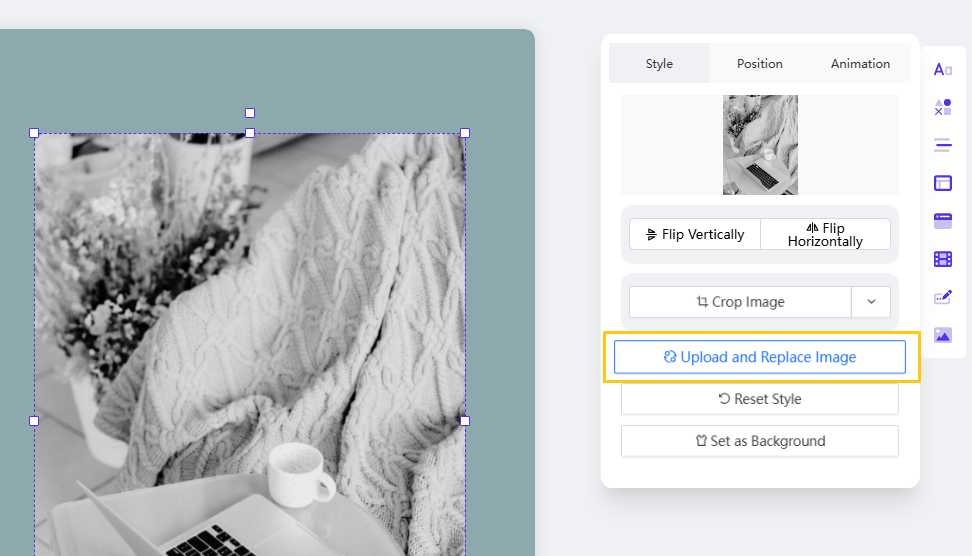
Step 1: Select the Image. Click the picture on the slide that you wish to replace.
Step 2: Access the Replacement Tool. Locate and click the "Upload and Replace Image" button (or icon), typically found in the floating toolbar or the right-hand editing panel.
Step 3: Upload New Image. Select the new image file from your device to upload it. The new image will replace the old one while automatically preserving the original size, cropping, and position on the slide.
Tip: You can also click the picture and choose "Replace" from the customization options.
2 Edit Image Appearance (Crop and Shape)
WorkPPT allows you to quickly adjust the presentation's overall look.
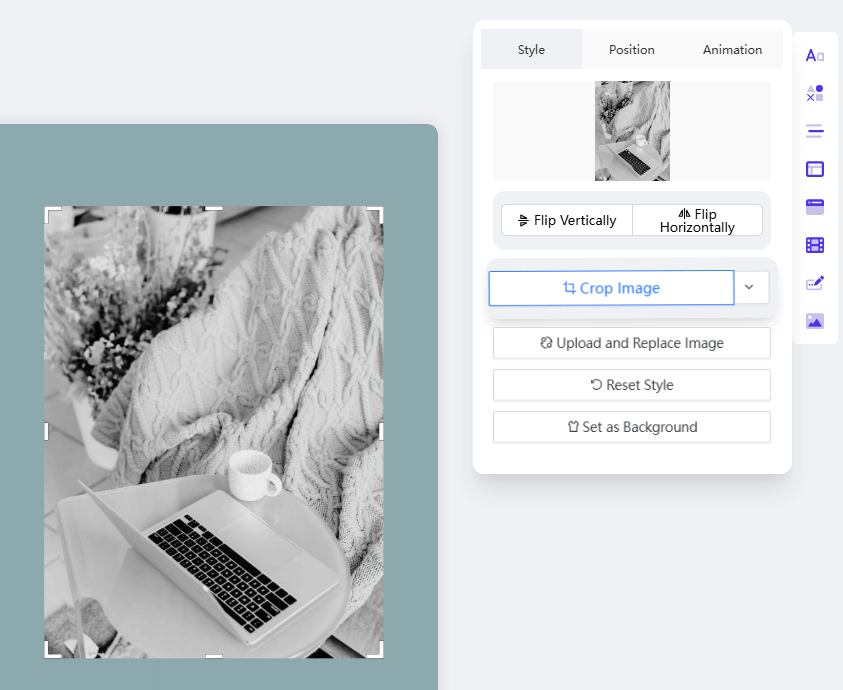
Step 1: Select Image. Click the picture you want to edit.
Step 2: Crop. Click the "Crop Image" button to adjust the visible area of the image.
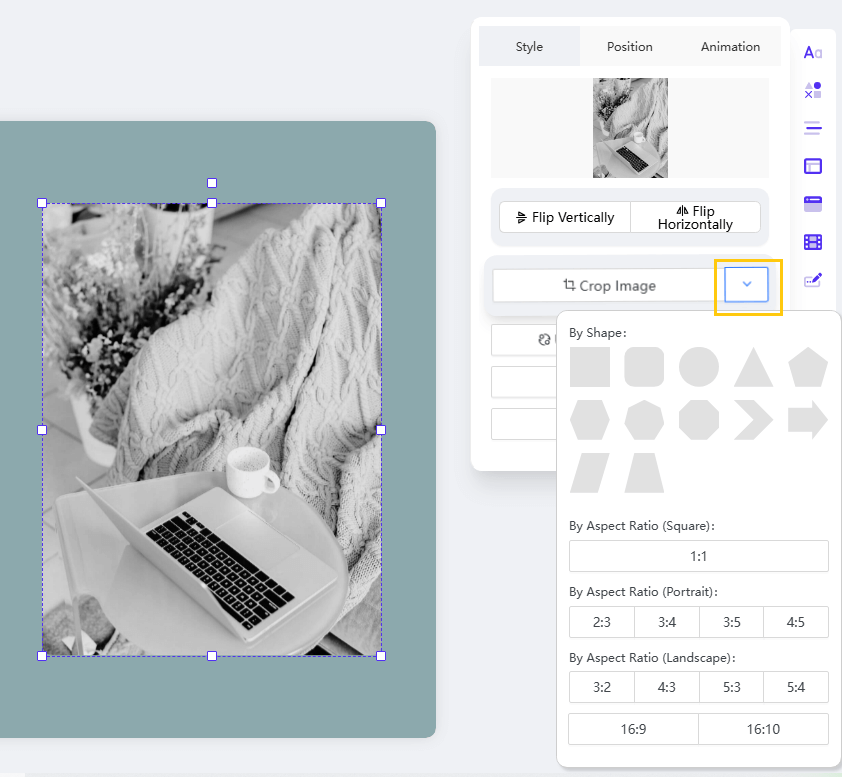
Step 3: Shape and Ratio. If you want to shape the image, you can click the dropdown icon next to the "Crop Image" button.
Shape: Choose a new shape (e.g., circle, star) to frame the image.
Ratio: Select a different aspect ratio (e.g., square, portrait, landscape) to resize the image area.
3 More tutorials of WorkPPT
How to Download and Share WorkPPT AI Slides
Once you have finished editing your presentation, you can easily save your progress, download the final file, or share a link for collaboration.
1 Saving and Downloading
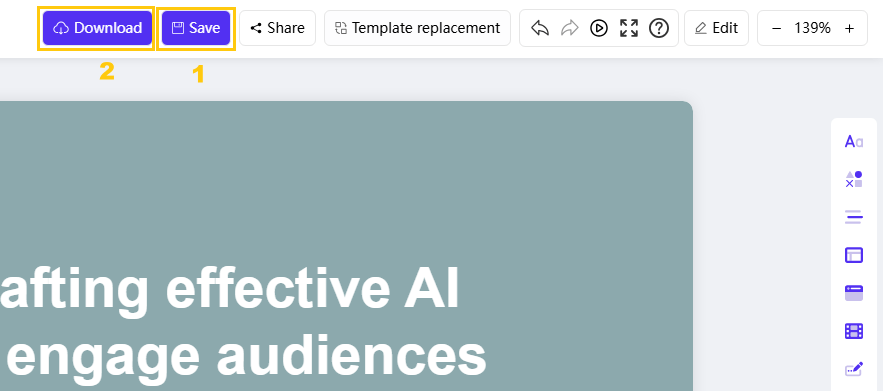
Step 1: Save Progress. Click the "Save" icon on the toolbar to ensure all your latest edits are secured.
Step 2: Access Download Options.Click the "Download" button.
Step 3: Select Format. Choose your desired download format:
PPTX: Editable presentation file.
PDF: Non-editable document format (good for final reports).
JPG/PNG: Image formats for individual slides.
2 Sharing via Link
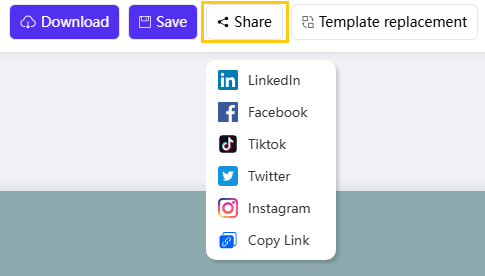
Step 1:Click Share. Click the "Share" button.
Step 2: Choose Method. Select how you want to share the presentation:
Copy Link: Generate and copy a direct link to share with others.
Social Platforms: Share directly to integrated social media platforms.
3 More tutorials of WorkPPT
How to Use AI Chat on WorkPPT
The AI Chat feature allows you to interact with an AI assistant directly within the WorkPPT environment for quick queries or content generation ideas.
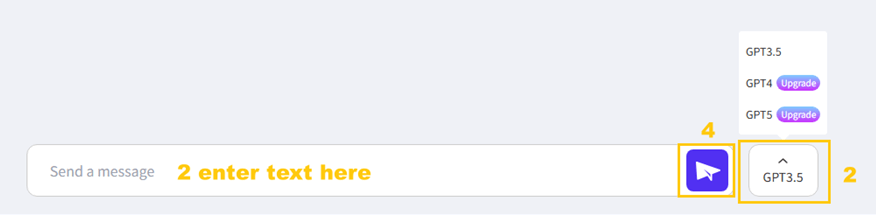
Step 1: Access the AI Chat. Locate and click the "AI Chat" icon on the right-hand toolbar.
Step 2: Select AI Mode (Optional). If available, you can choose a specific mode, from GPT 3.5 to GPT 5 to utilize different AI models for your response.
Step 3: Enter Your Query. Type your text, question, or command into the input text bar.
Step 4: Initiate Chat. Click the send button to submit your request and receive the AI's response.
1 More tutorials of WorkPPT
How to Edit the PDF Files on WorkPPT
This tool allows you to perform essential document management tasks, accessible via the "AI PDF" feature on the left sidebar.
1 Saving and Downloading
Step 1: Access the PDF Editor. Click "AI PDF" on the left toolbar.
Step 2: Choose a Feature. Select the desired PDF editing feature from the available options: Merge PDF, Split PDF, Add Stamp to PDF, Add Watermark to PDF, Convert Image to PDF, or Convert PDF to Image.
Function
Step 3: File Input & Action
Step 4: Finalize
Merge PDF
Upload the PDF files you want to combine. You can set sort order by name or date if you need.
Click "Merge" and the merged PDF will download automatically when it is done.
Split PDF
Upload the large PDF file. Specify the pages or page ranges to extract.
Click "Split" to download the new, smaller file(s).
Convert Image to PDF
Upload the image file(s) (e.g., JPG, PNG).
Adjust orientation (if needed) and click "Convert."
Convert PDF to Image
Upload the PDF file.
Select the desired output image format (e.g., JPEG or PNG) and click "Convert."
Add Watermark to PDF
Upload the PDF. Enter the watermark text or upload a logo image.
Set the transparency, rotation, and placement, then click "Apply."
Add Stamp to PDF
Upload the PDF. Select the stamp type (e.g., Approved, Draft, or a custom image).
Place the stamp on the required location on the page(s), then click "Apply."
2 More tutorials of WorkPPT
How to Summarize Your Files/Link/Text with WorkPPT
The AI Summarizer feature allows you to quickly extract key information and concise summaries from various content sources.
Step 1: Access the Summarizer. Locate and click the "AI Summarizer" tool from the main interface or toolbar.
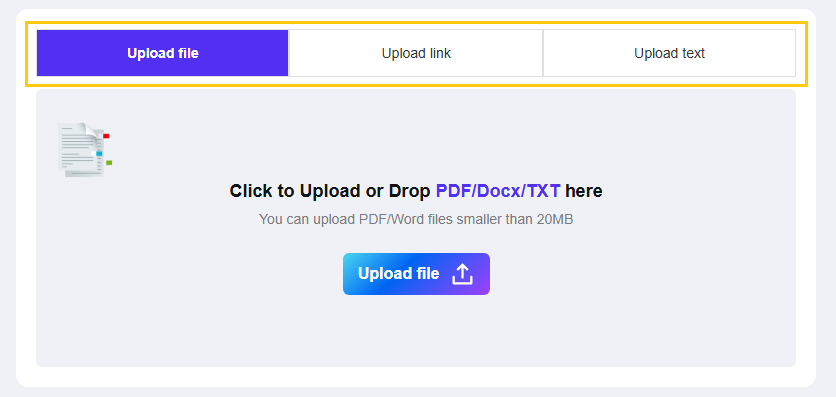
Step 2: Choose Input Method. Select one of the three available upload methods:
Upload File: For documents (e.g., reports, PDFs).
Upload Link: For web articles or online resources.
Upload Text: For direct text input (copy/paste).
Step 3: Submit Content. Depending on your selection:
Click the upload button to browse and select a file.
Paste the link or text directly into the designated area.
Step 4: Generate Summary. Click the "Summarize" button to initiate the AI analysis.
Step 5: Copy Result. The summarized result will be displayed. Click the "Copy" button to easily save the summarized text for use in your slides or notes.
1 More tutorials of WorkPPT
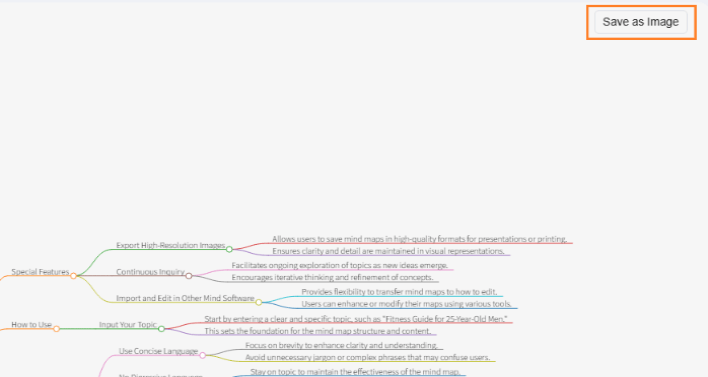
How to Generate AI Mind Map with WorkPPT
This feature allows you to quickly visualize your ideas or text into a structured, editable mind map.
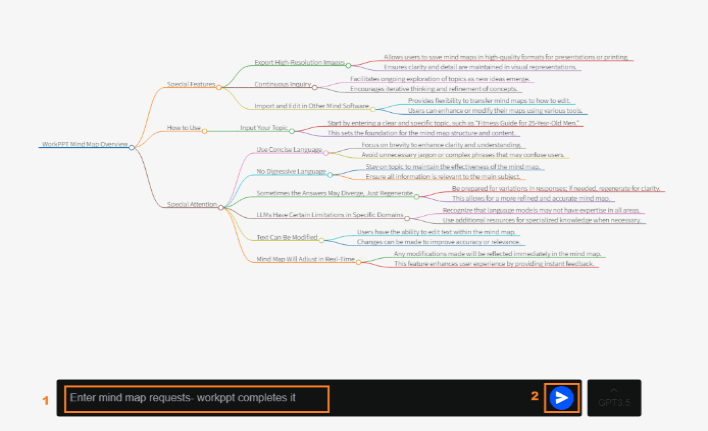
Step 1: Enter Content. Choose AI mind map features on the left menu. Type your desired topic or paste your source text into the designated input area.
Step 2: Generate Map. Click the button. The AI will automatically analyze your input and generate the mind map structure.
Step 3: Edit Text (Optional). Click on any node (text box) in the left-hand area to easily modify the mind map text and structure.
Step 4: Export. Click the "Save as image" button to export and download your final mind map as an image file.

 Create AI Presentation
 AI Chat
 Edit PDF File
 AI Summarizer
 AI Mind Map
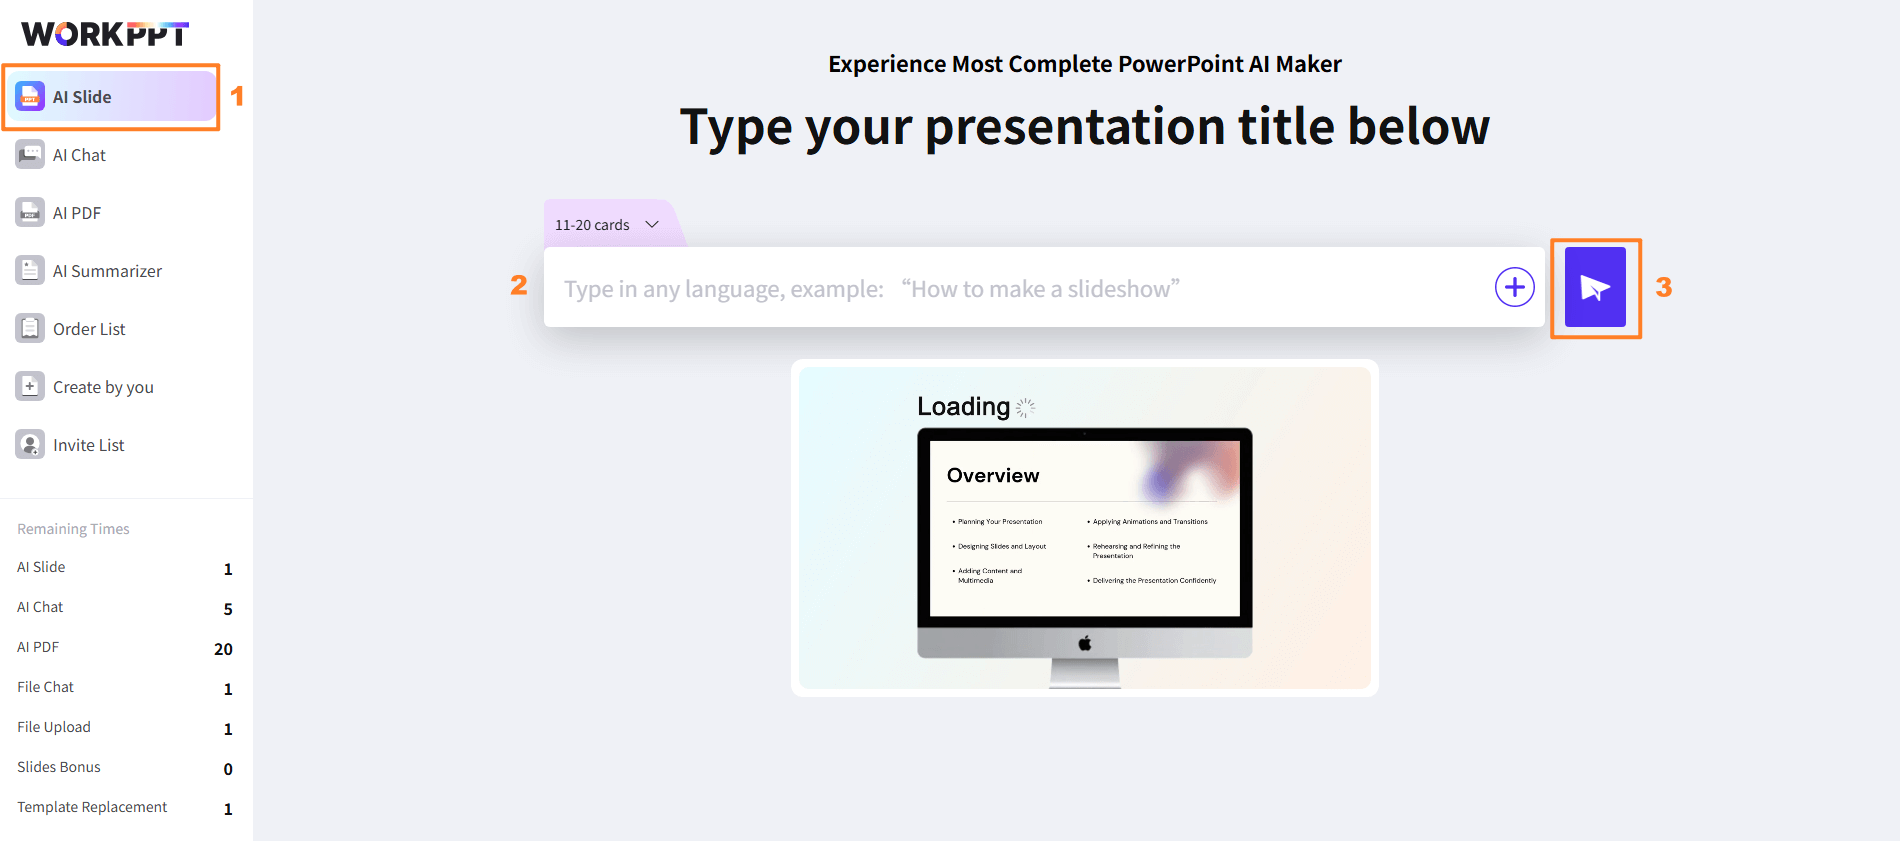

 Insert Subject
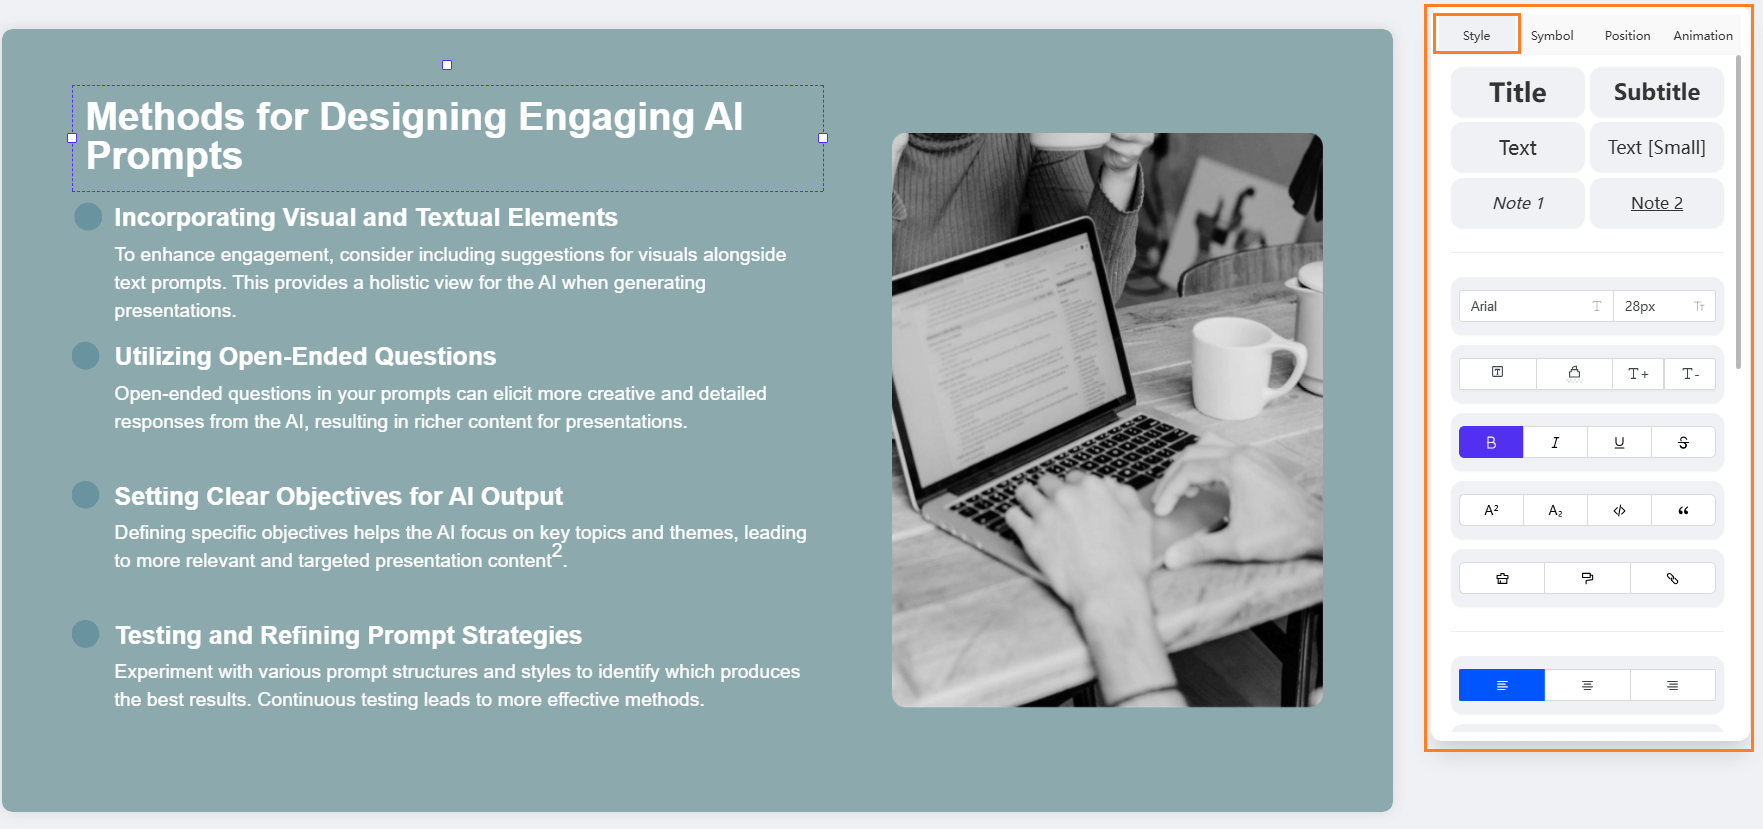


 Home
Home
 Pricing